
Mapping for CS2KZ
The aim of this document is to help guide new and experienced mappers towards improving the quality of their CS2KZ maps in preparation for global map approval. Following this guide will provide insight and resolutions to issues that may prevent your map from being approved. This document is written under the assumption that you have previous experience using the Hammer map editor.
Getting started (install the plugin)
Core KZ gameplay elements such as bunnyhop and teleport triggers are easily implemented using the CS2KZ Mapping API. To get setup and run your map with the CS2KZ plugin and Mapping API features, vist zer0.k's cs2kz mapping. Note that these setup scripts may need to be run in administrator mode to function properly.
Once installed, you will have a new set of CS2KZ features available for trigger_multiple entities.
WARNING
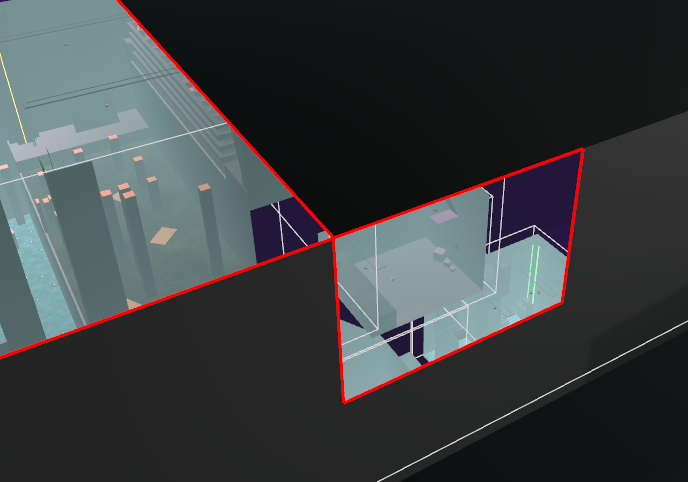
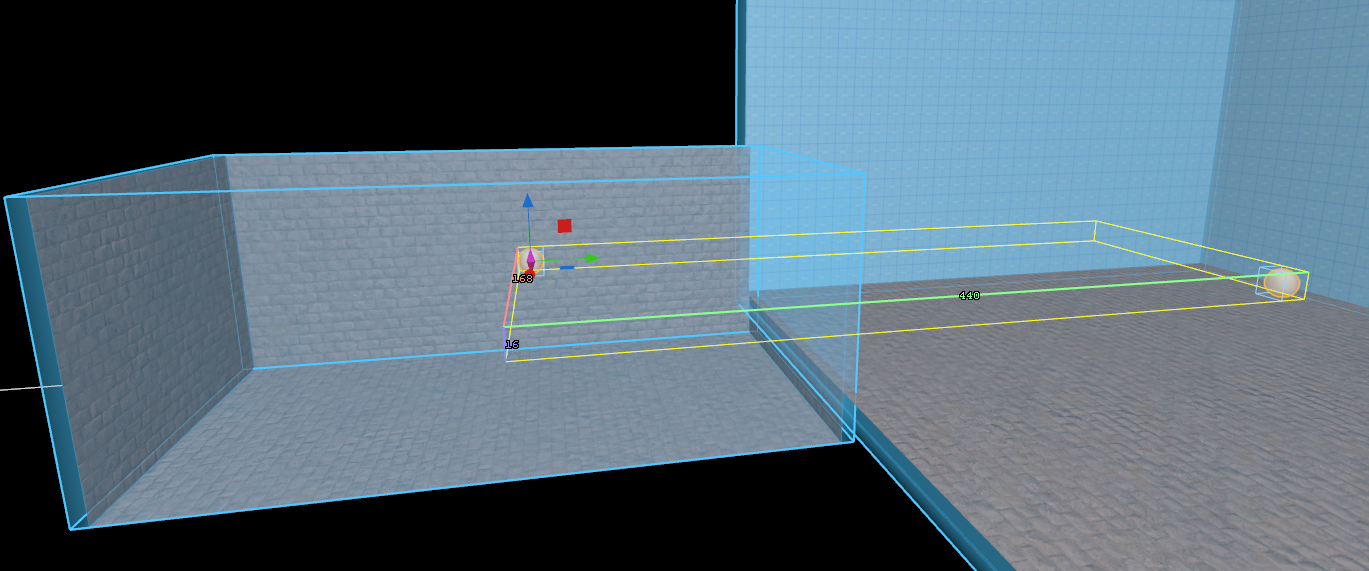
- Physics boundaries for triggers are not determined by the shape of their mesh by default. Instead physical boundaries for triggers are defined by their total width and length (object boundary). This makes any trigger with a complex shape redundant. To resolve, select the trigger in mesh mode, then within the mesh properties change physics type to
mesh.

32. L shaped trigger with different physics types
Design
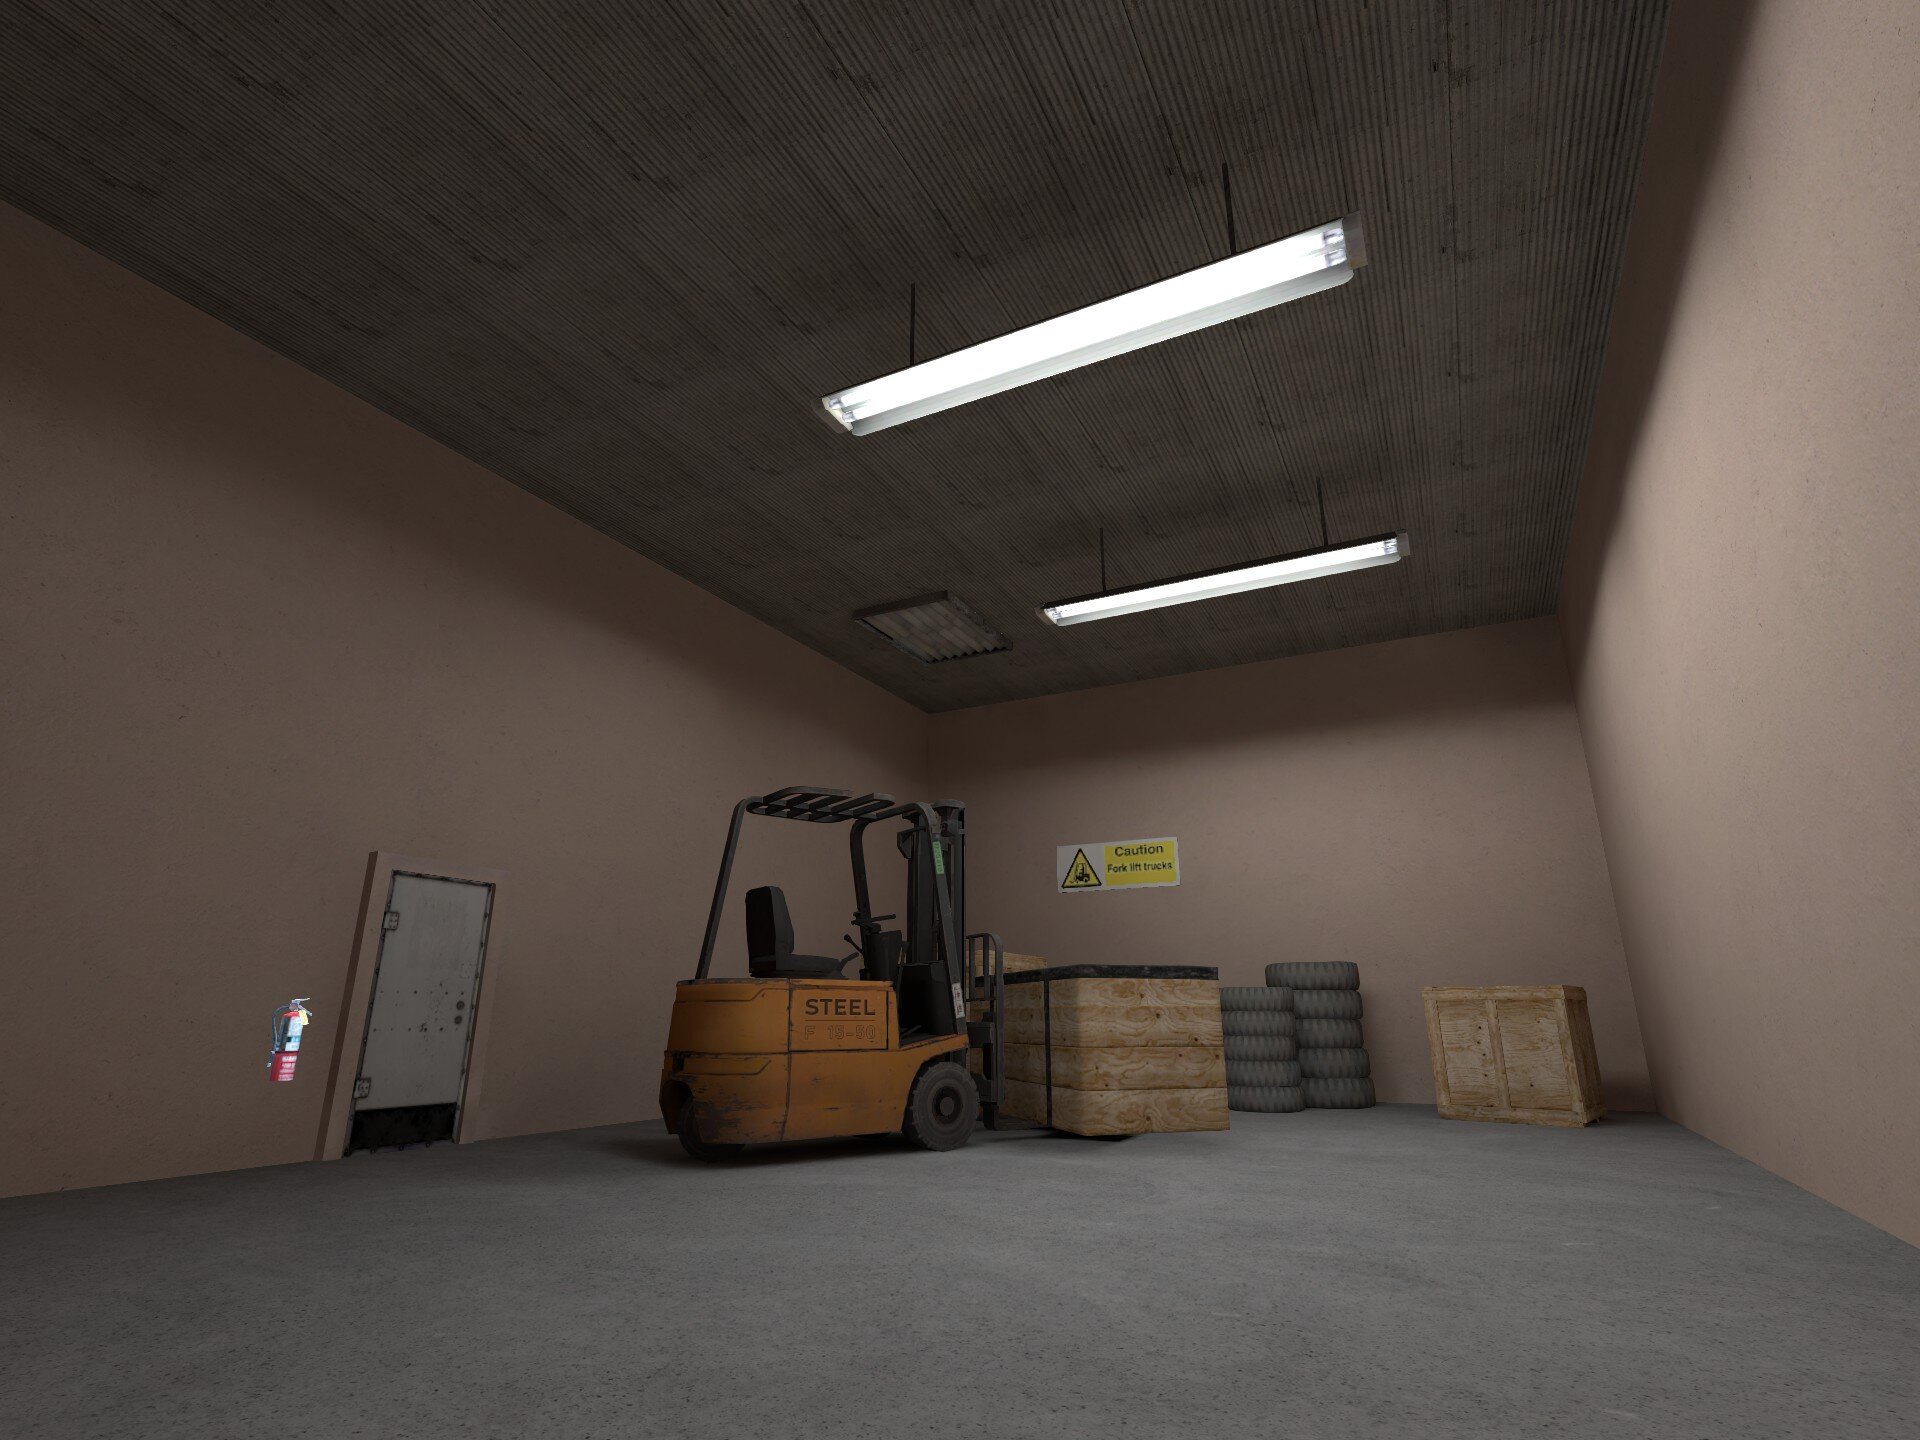
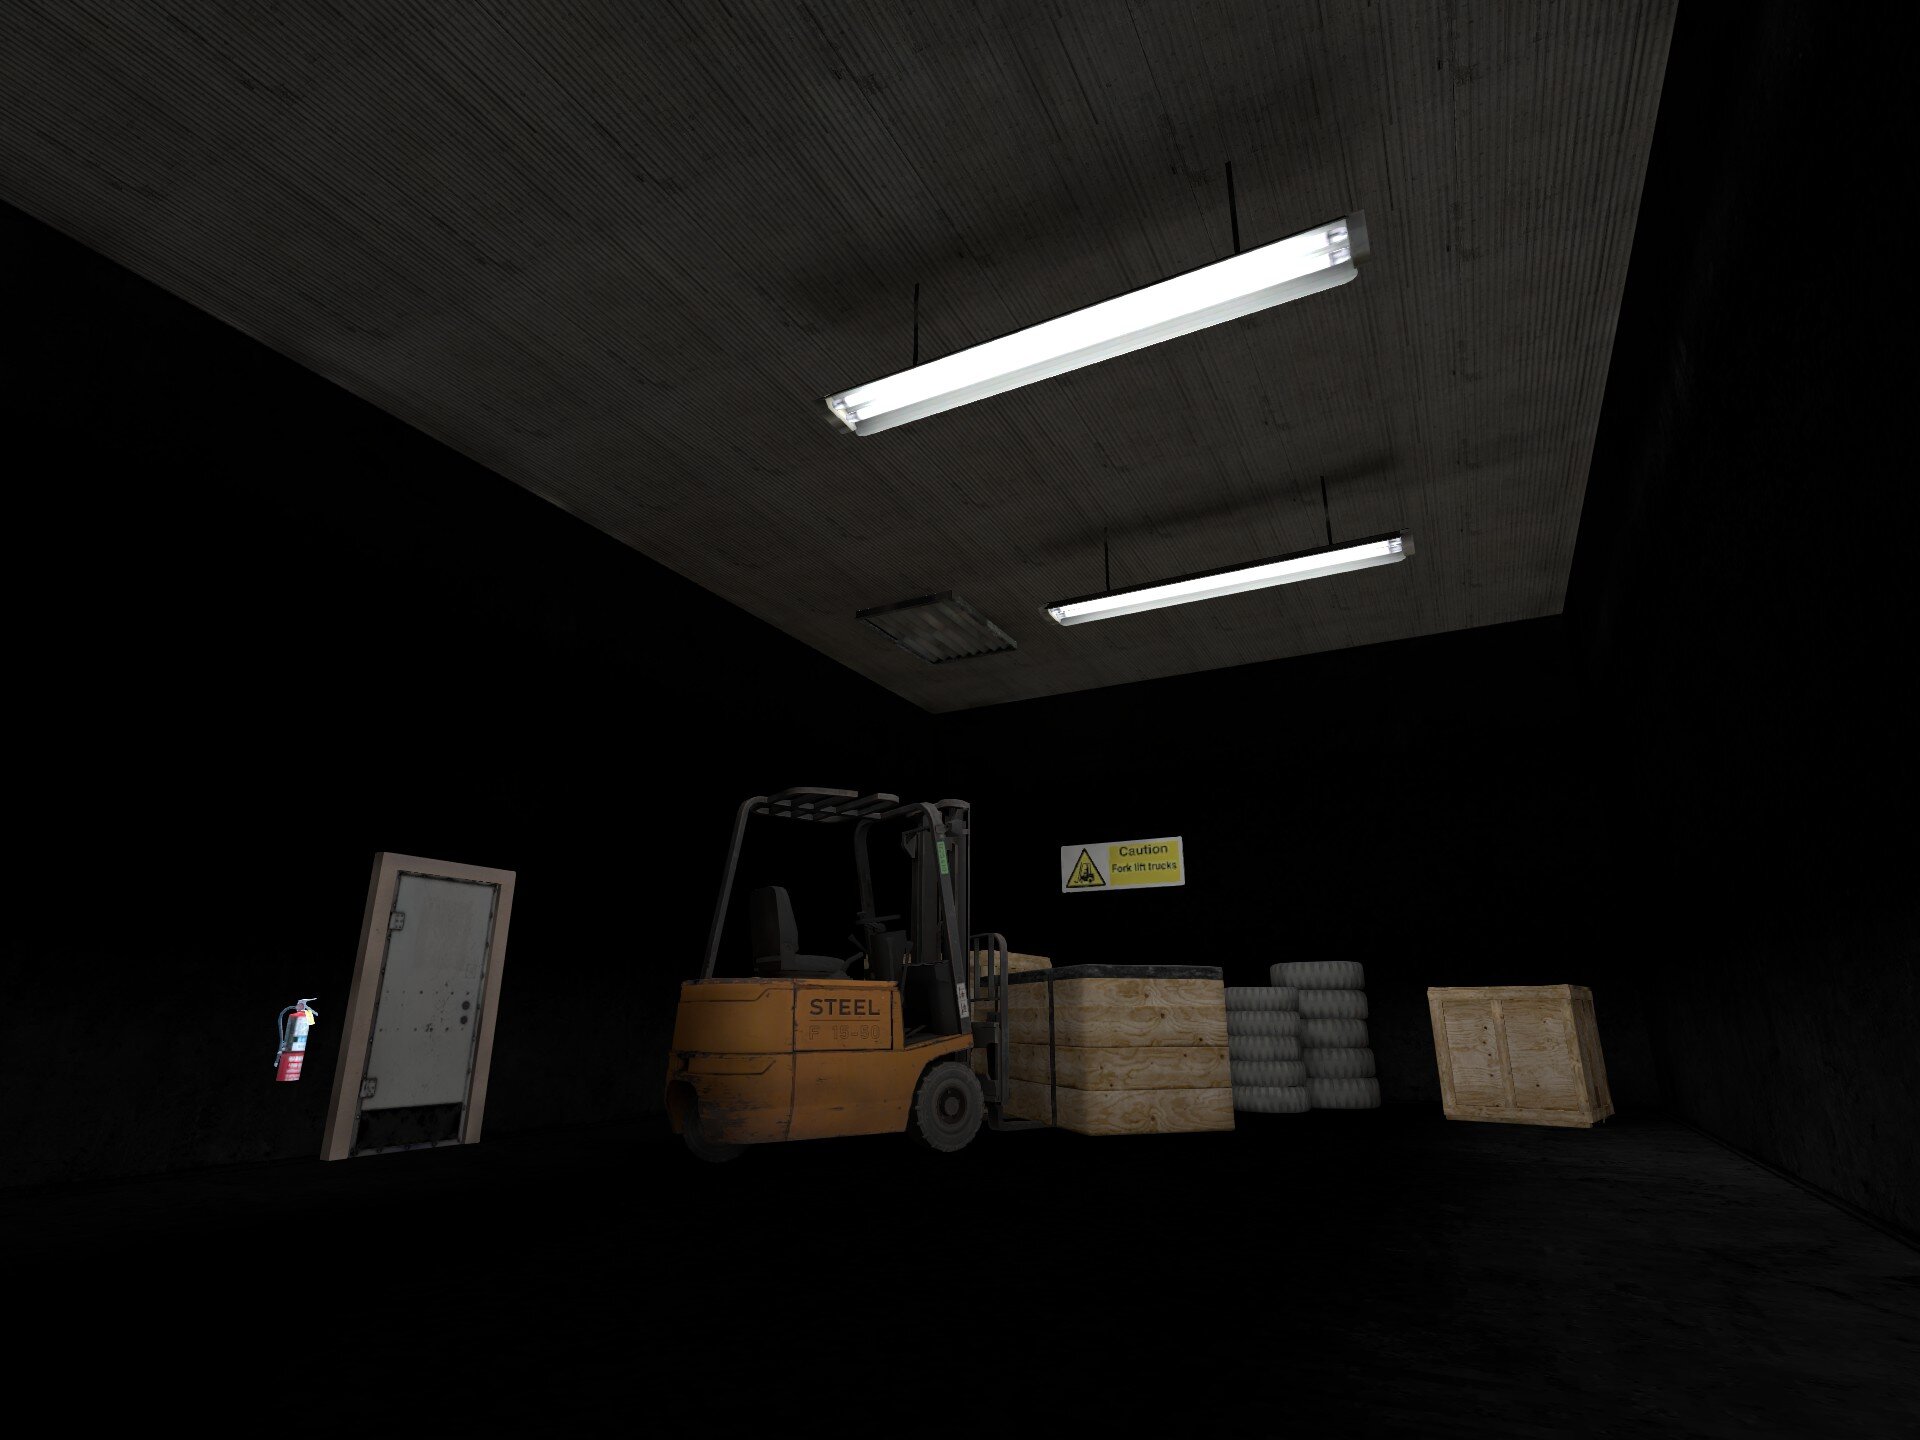
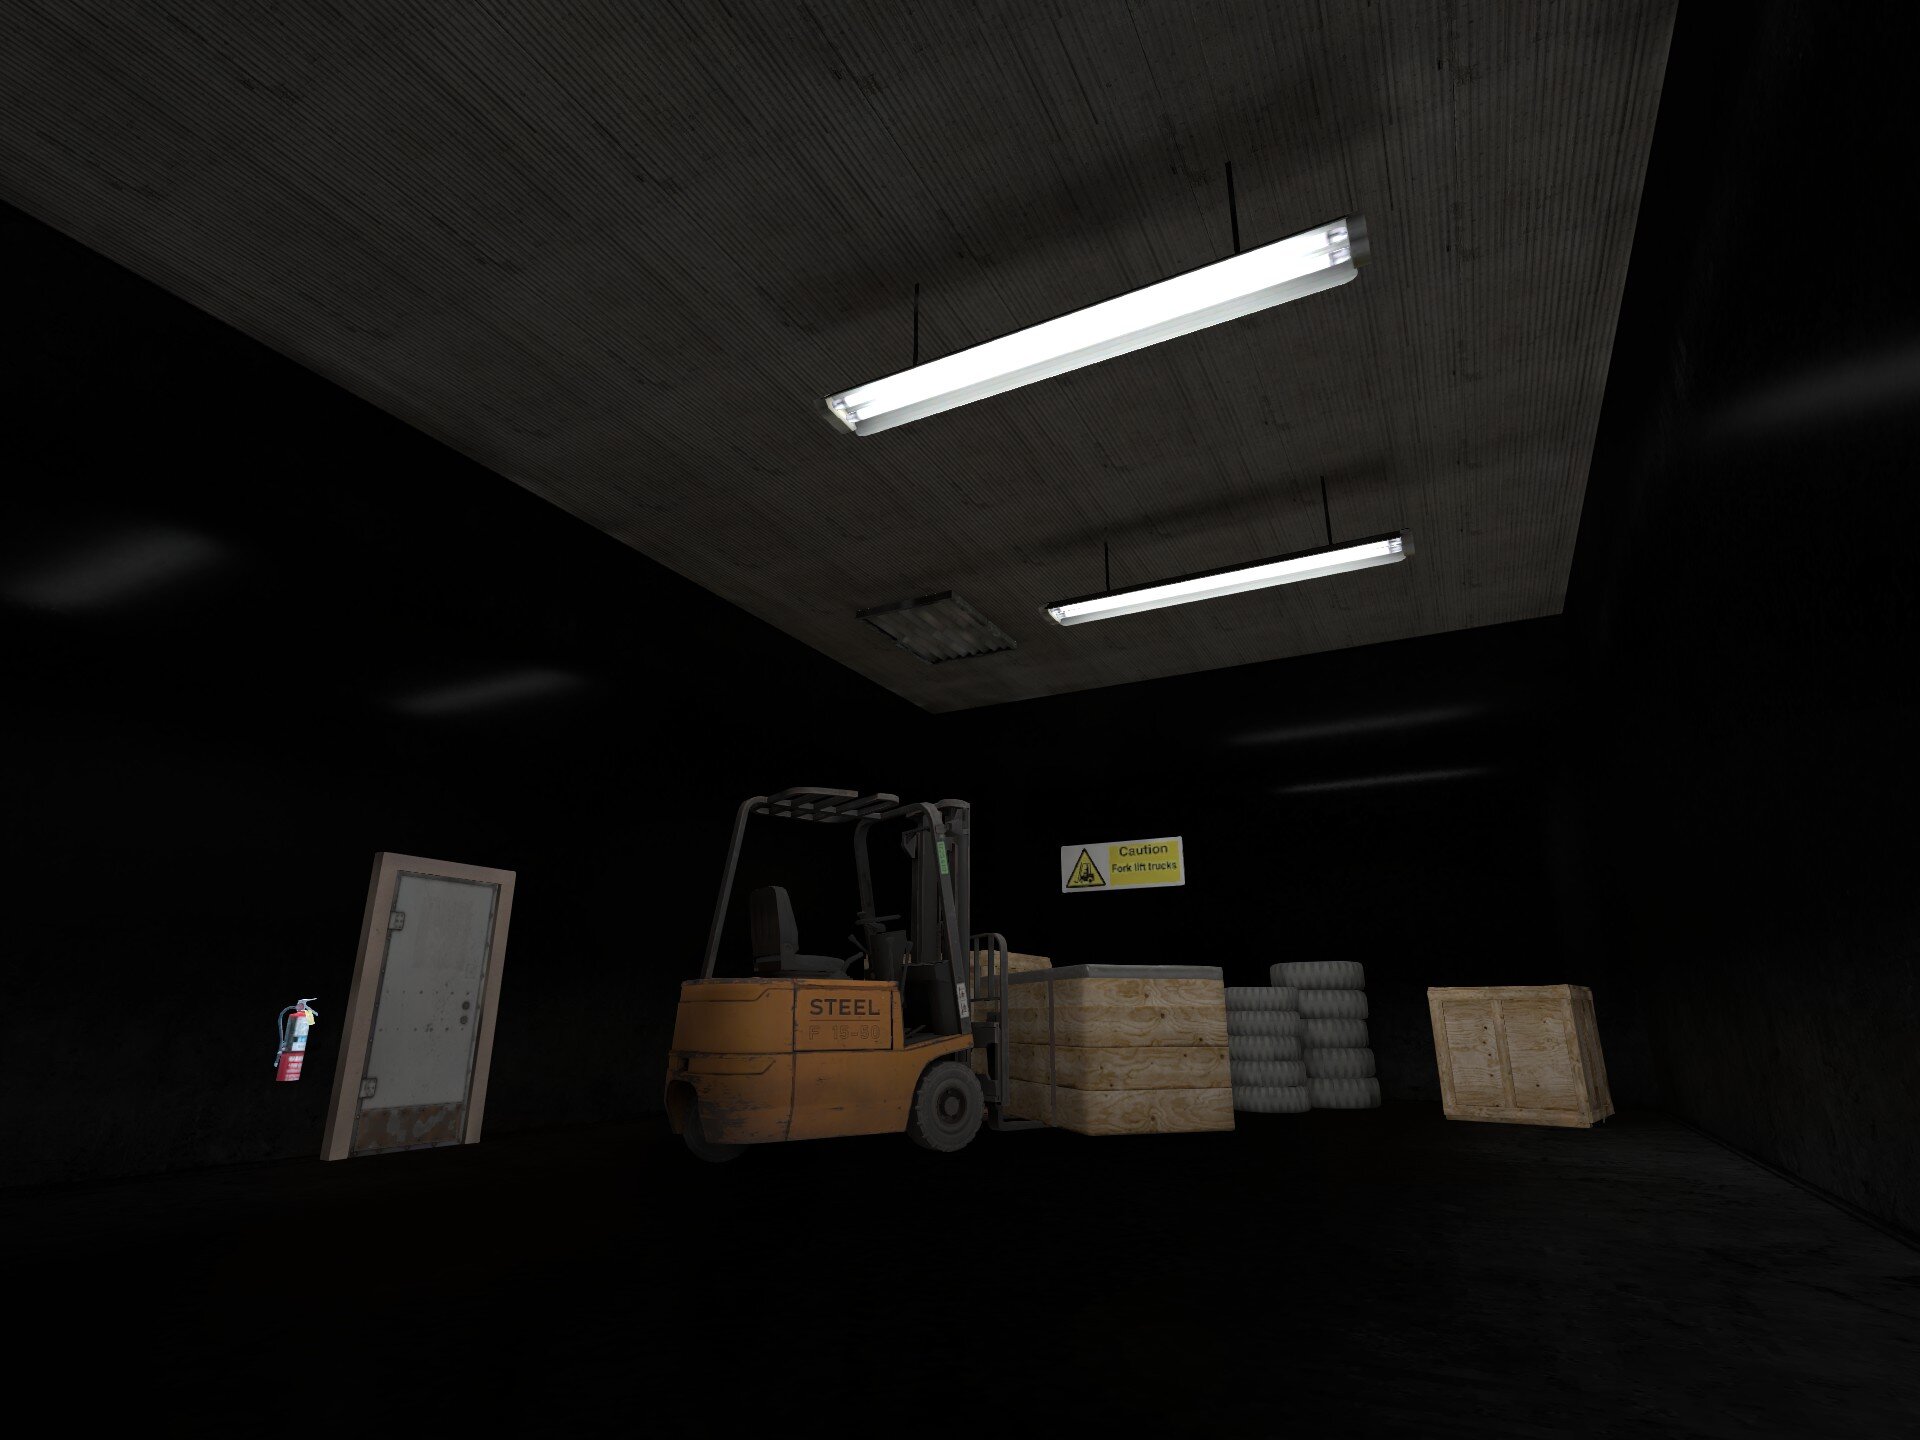
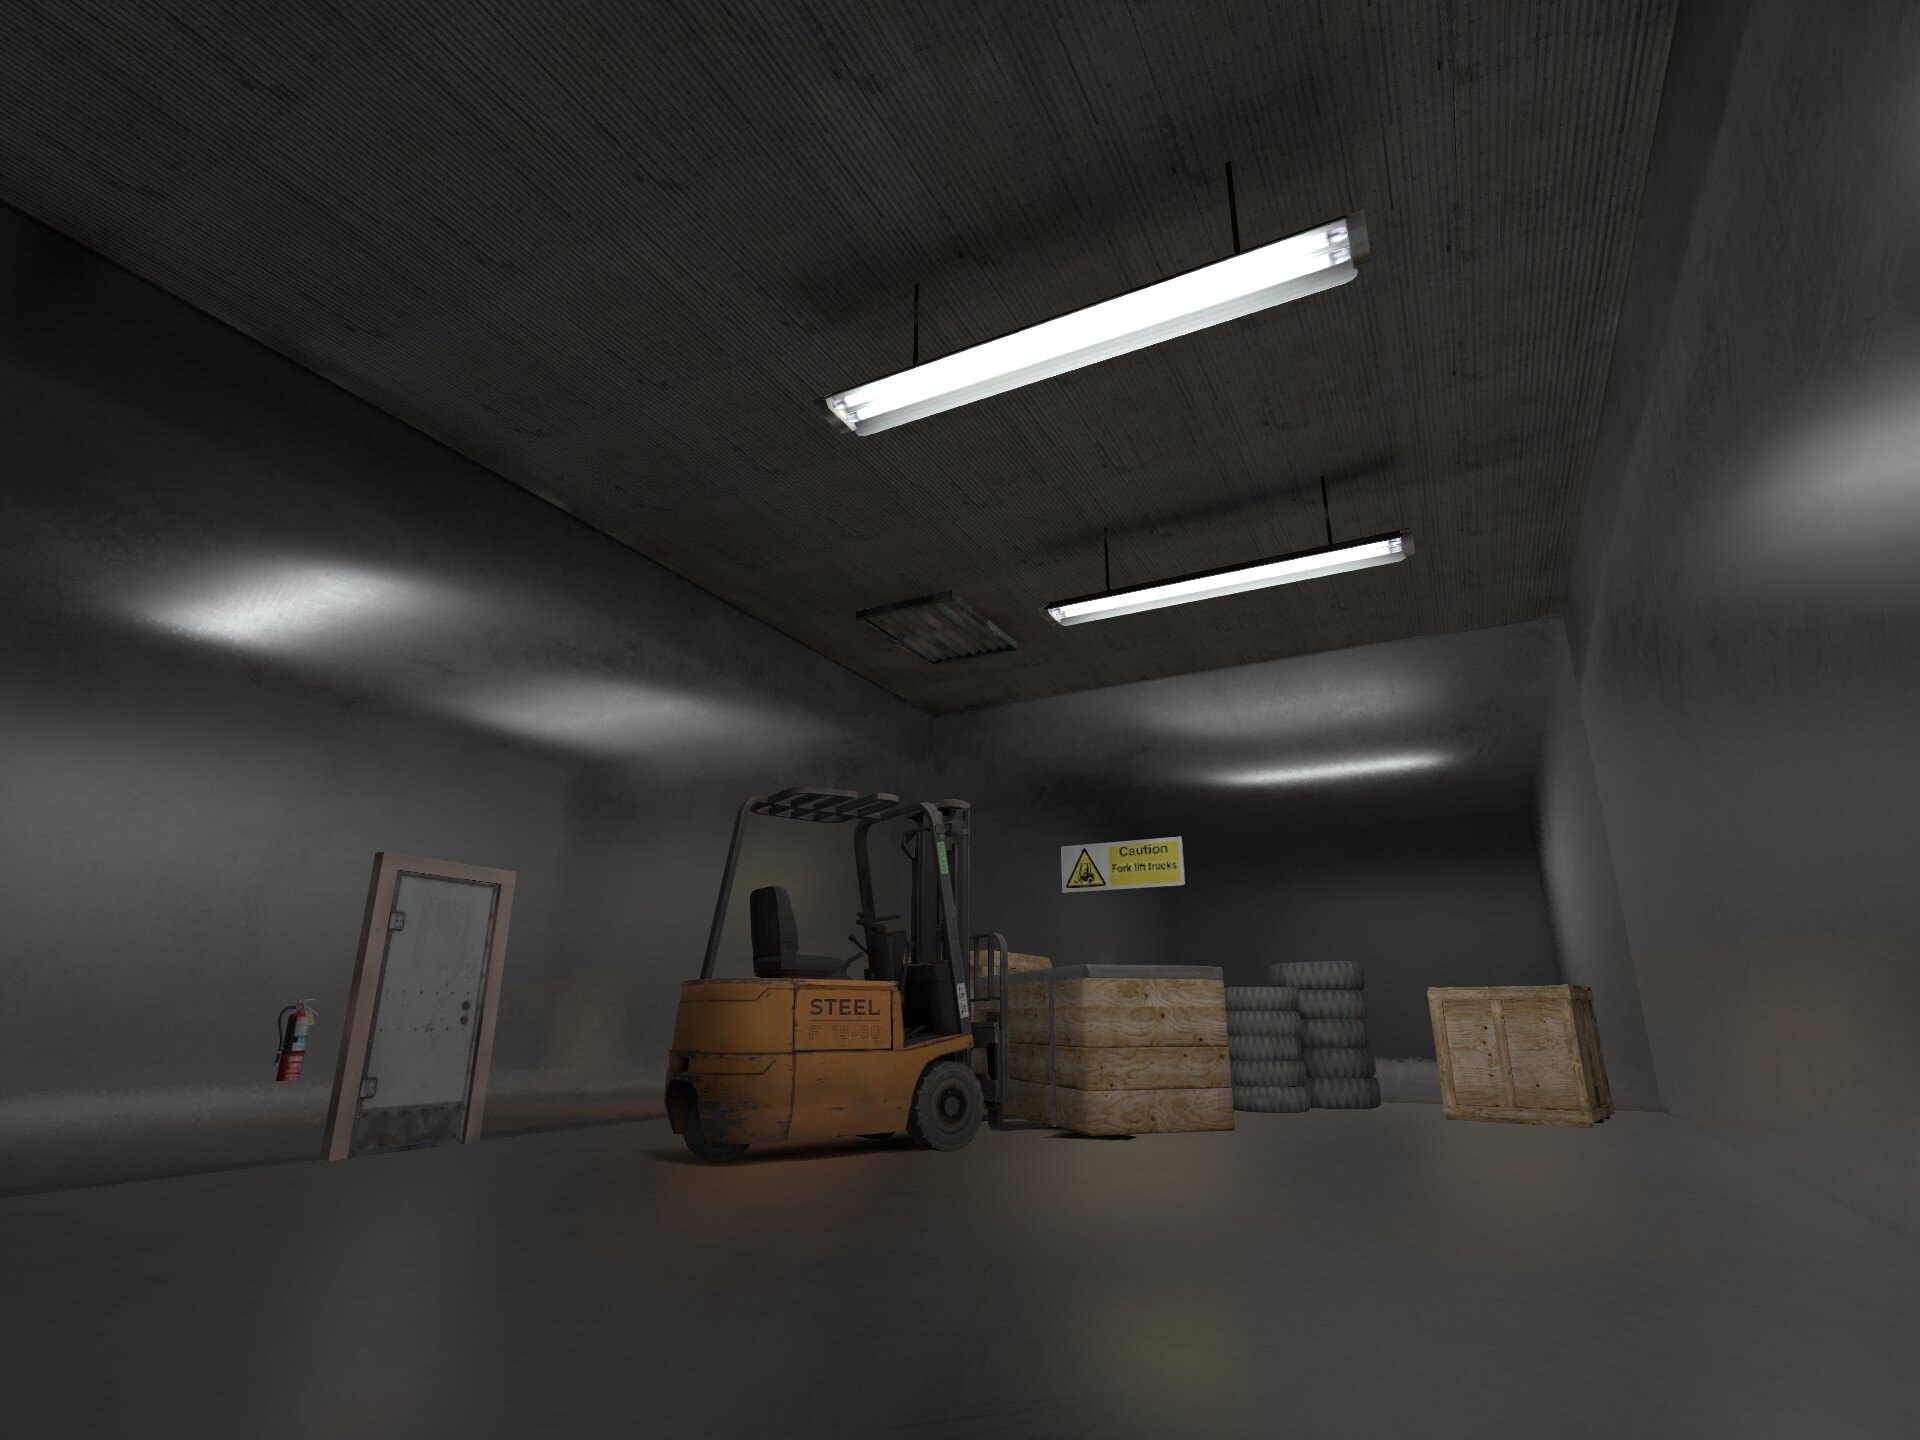
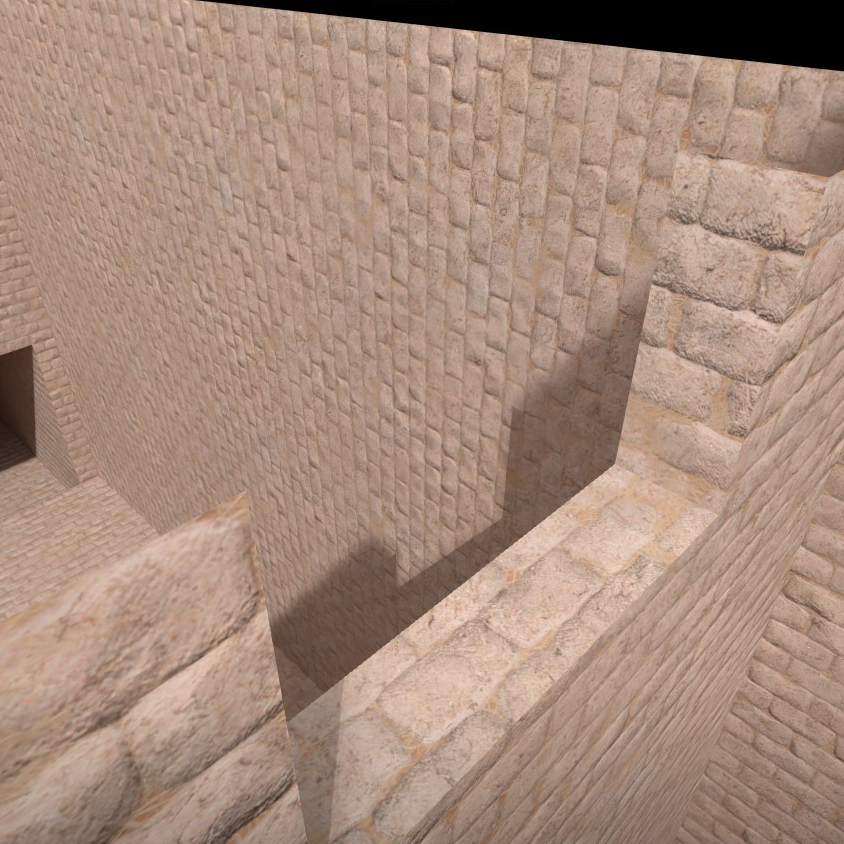
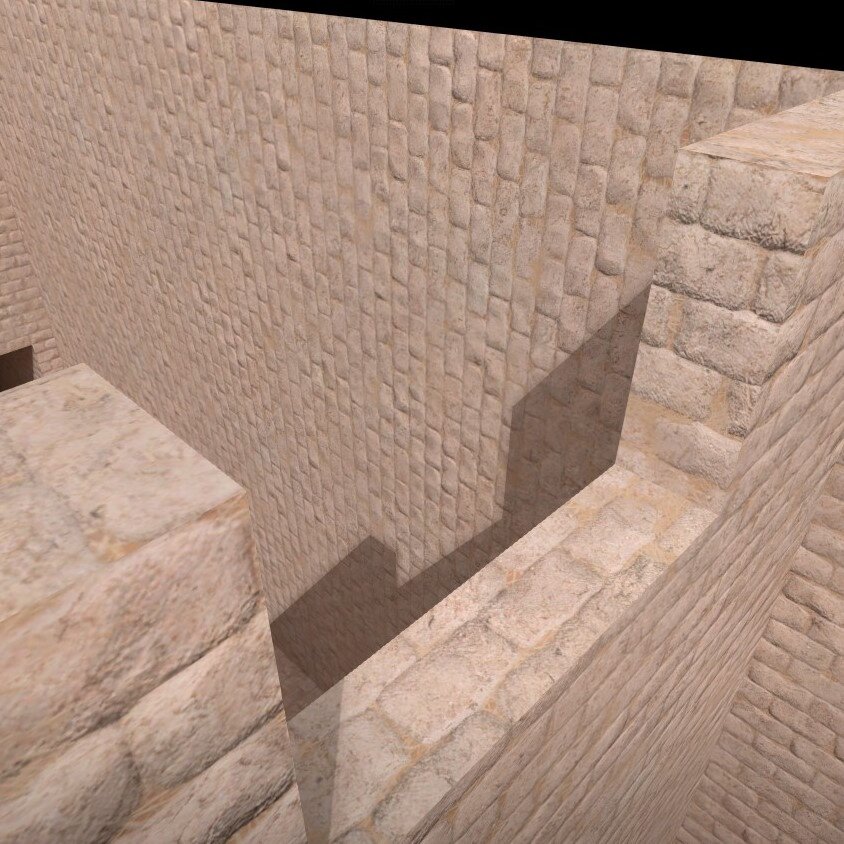
To secure a spot in the Global Map pool, your map requires functional gameplay and a level of visual polish that goes beyond the basics. Maps that consist of "box rooms" with flat textures tiled across large surfaces are typically rejected as they lack the environmental depth expected for global standards.
Break up large empty spaces by introducing geometry which disrupts the room's silhouette. Adding structural elements such as pillars, recessed wall panels, or trim where surfaces meet can create natural highlights and shadows, transforming a hollow shell into a lively space.
Avoid employing a "jumps along a wall" design where the player simply follows a linear path through a box corridor. Instead, utilize the full 3D volume of your room to force changes in elevation and direction. Integrate your platforms into the environment itself rather than using generic floating blocks, have players navigate across protruding vents, hanging machinery, or natural rock formations. This grounds the gameplay in a cohesive setting and ensures the map feels like a complete world rather than a simple test room.
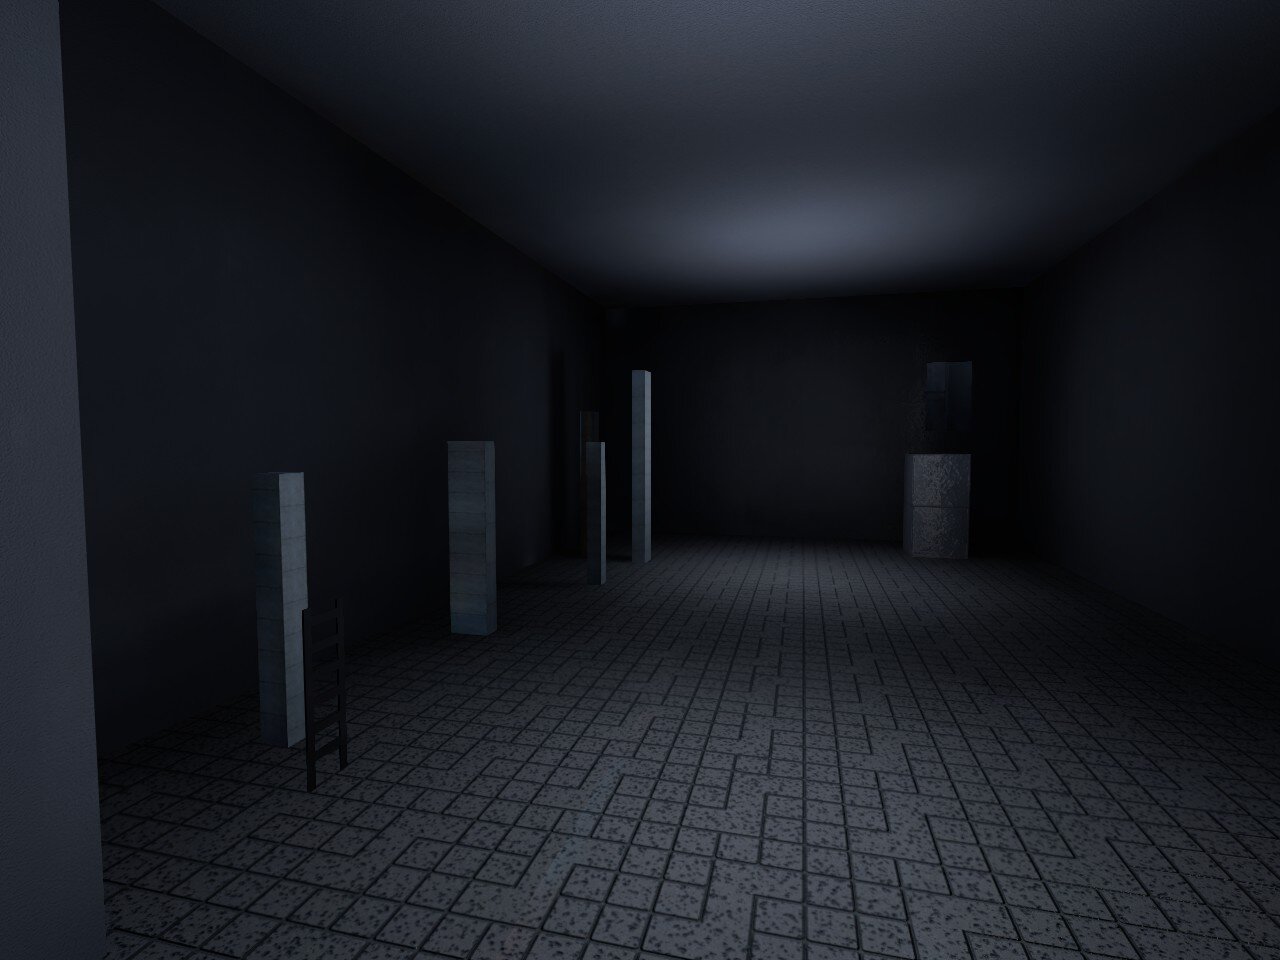
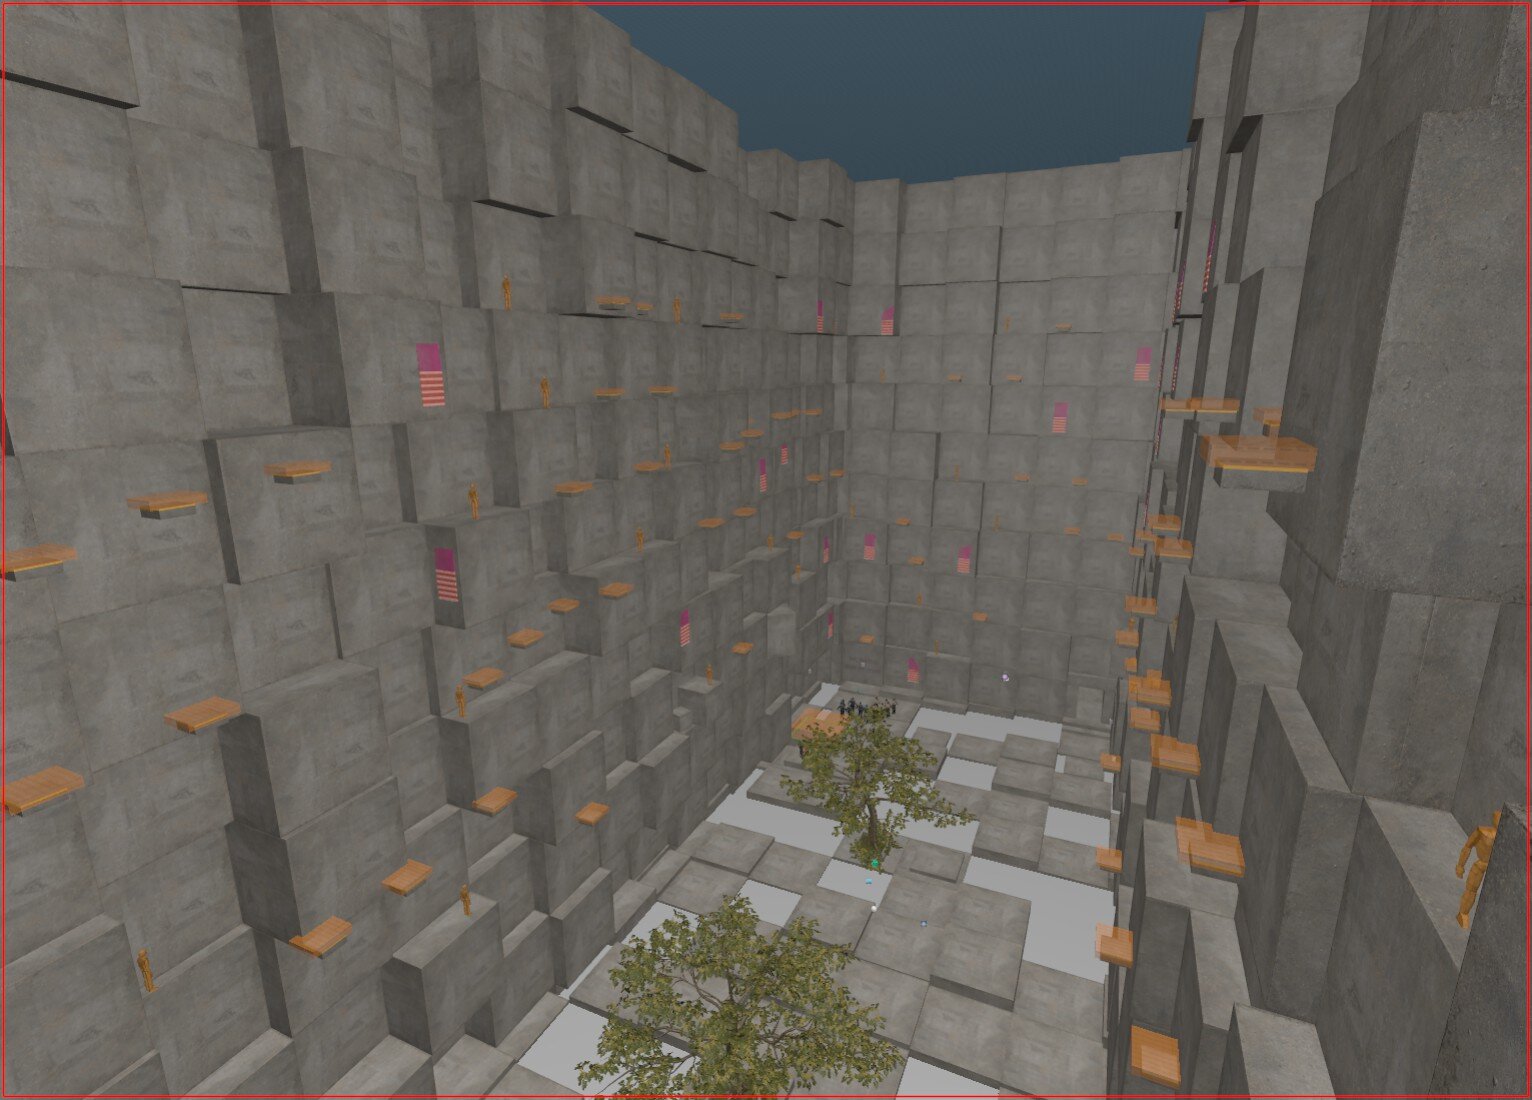
1. Barren kz_insomnia
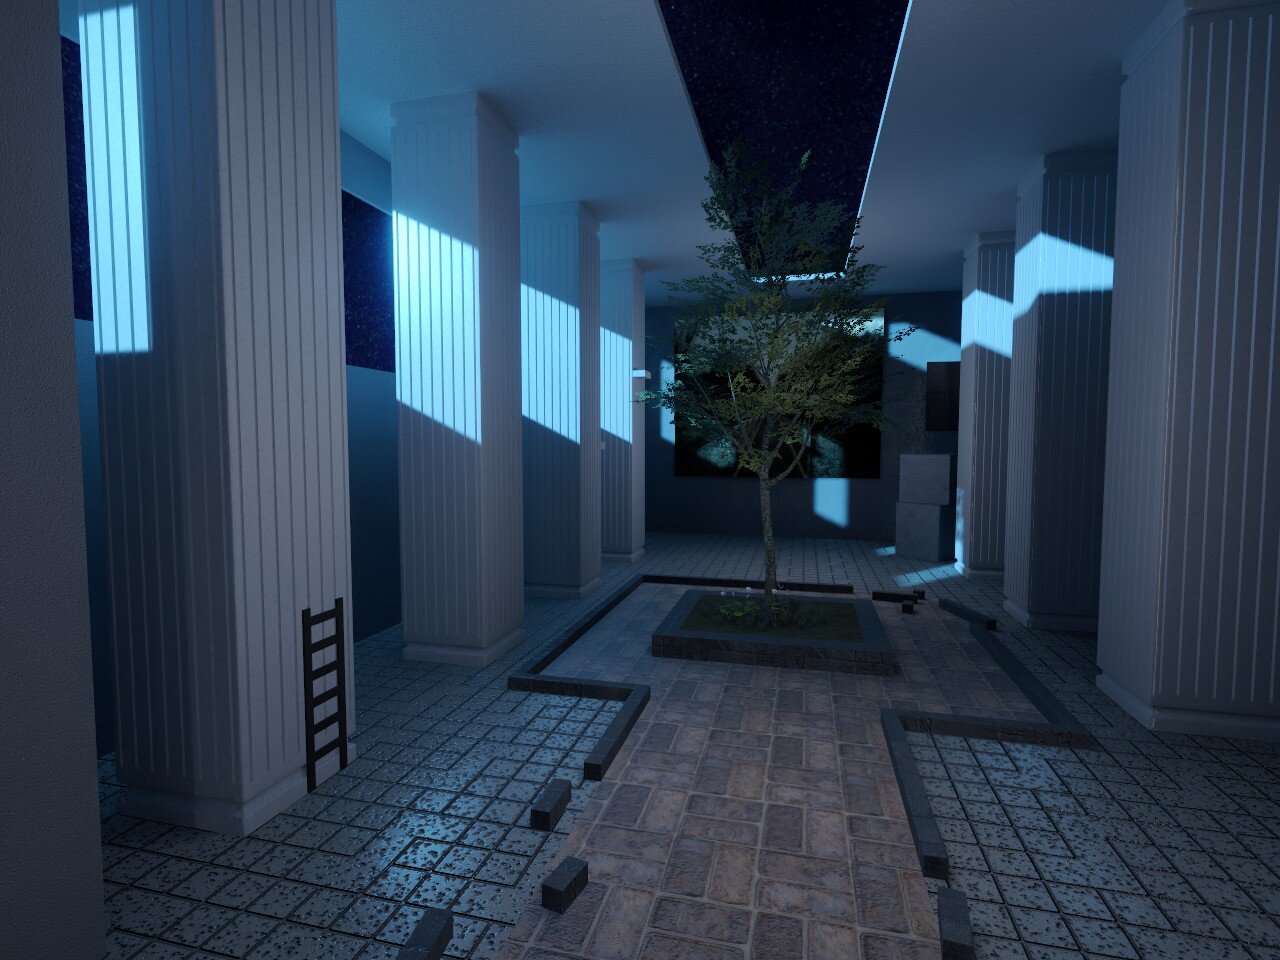
2. Detailed kz_insomnia
Tiering
In CS2KZ tiers are used to indicate the difficulty of a map. Once you've submitted a map for global approval the tier for CKZ and VNL will be determined by the map approval team. If your intention is to map for a particular difficulty it is important to know how these tiers are differentiated. While this guide provides a rough description for each tier, appreciate that there are many nuances to tiering which can be difficult to quantitatively define. For example, distance is just one of many factors which contribute to the difficulty of a jump.
CKZ
Tier 1: No multi-strafing required (max 235 block). Players who are new to KZ should be able to complete these maps but may need to line up for jumps.
Tier 2: Some multi-strafing required. May include rudimentary box-tech jumps, short multi bunny-hop sequences. Expect longjumps up to ~240 units. May include very easy slide ramps and ladder jumps which require little to no precision/strafing.
Tier 3: Entry level timing and precision. Expect longjumps up to ~250 units. Box-tech is slightly more difficult, bunny-hop sequences are both longer and harder with single hops being rare or relatively easy when incorporated. Introduction to more challenging slide ramps and ladder jumps.
Tier 4: Good timing and precision is required for most jumps. Expect long jumps up to ~260 units. Bunny-hop sequences may be single-hop only but routing will still be relatively simple. Some blocks may be timed, or anti-bhop but are not too challenging. Slides require more precise entry/exits and may involve basic resurfs. Ladder jumps are expected. Some more niche techniques such as danvari tech, vesq tech and wallstrafing can be expected. Intermixed elements of gameplay sequences are introduced but are relatively simple.
Tier 5: Proficiency in longjumping, bunny-hopping, sliding and ladders is required. Expect longjumps up to ~270 units. Various elements of gameplay are often intermixed. Bunny-hop sequences may be longer or more technical, with a majority of the blocks being single-hop only. Timed and anti-bhop blocks are frequently implemented to force a longjump or pre-keep. More technical slide and ladder gameplay is common and typically requires precision or strafing. Niche tech is more frequent and challenging.
Tier 6: Sequential intermixed gameplay elements are prevalent and require a solid understanding of various techniques. Expect longjumps up to ~275 units and a stronger emphasis on multi-strafing for all gameplay elements. Bunny-hop sequences are far more technical with routing being equally complex.
Tier 7: Almost entirely consisting of sequential intermixed gameplay elements, extreme longjumps, bunny-hop sequences, slides and ladder jumps that require precision and multi-strafing. Expect longjumps above ~275 units.
Tier 8: Mastery of all aspects of KZ are required pushing the best players to their limits. The highest tier humanly possible for runs on CKZ courses.
Tier 9: Technically possible with TAS but not for humans. If somebody beats a Tier 9 it should really be a Tier 8.
Tier 10: Impossible, even with absolutely perfect input and technique (effectively reserved for maps which are impossible in VNL but feasible in CKZ).
VNL
Tier 1: Should be doable by a player who was just taught how to move in game. Minimal turning and no crouch jumps (i.e knows how to go from the base of xbox to short on de_dust2 and knows how to climb a ladder).
Tier 2: Most basic air strafing, bhopping, surfing, ladders, and corners. Knowledge of CJ.
Tier 3: Starts to require more advanced understanding of T2 techs. LJs up to 235 block (i.e difficulty of window to cat on mirage). Techs such as pre keeping, HSW, and vesq tech are required. No more than 235 LJ block.
Tier 4: Starts requiring harder techs such as basic JBs (90* & 180*), walking bhop blocks, ladder glide, danvari tech, and more proficient in all previous techs. No more than 241 block LJ.
Tier 5: Requires players to start spending a bit more time trying. Better execution of previous techs, 241 LJ block max, advanced turning knowledge, harder bhops.
Tier 6: Binds starting to be considered, player needs very good knowledge and execution of all techs.
Tier 7: The hardest VNL techs combined with strafey jumps or very weird pre-keep.
Tier 8: Reaching close to the limits of what is doable by humans. Player requires world record level skill and flawless execution of all VNL techs.
Tier 9: Unfeasible. Technically possible but a human will likely not be able to do it (e.g kz_saishuu PRO).
Tier 10: Impossible. Beyond what is possible with the current game mechanics (e.g surfing to gain height or LJ'ing 260 block).
Learn more:
VNL Map Running Spreadsheet, by Global Map Coverage
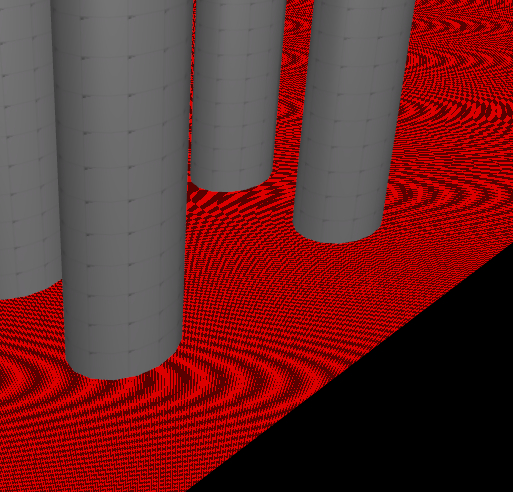
Meshes
In Source 2, the world and its objects are mesh based. This differs from Source 1's brush system whereby the world is built with "blocks". In simple terms this means that a map should be designed as a single continous hollow object rather than a space enclosed by a series of solid objects. The new mesh based system offers a far more intuitive approach to building your map however will require some background research if you're coming from Source 1.
It is highly recommended that you move towards this new system if you haven't already since many optimization issues previously manageable within Source 1 will not work the same way and can lead to later visual issues under Source 2's mesh based system.
Maintaining a clean workflow saves you from a lot of troubleshooting later.
WARNING
- When working with a mesh work you may encounter red edges. This means you have "bad" faces. Right click a nearby face and
Remove Bad Facesto resolve.
3. Bad faces caused by improper mesh work.
Learn more:
Source 2 101 - Hammer Crash Course #1 : Good workflow habits, by Eagle One Development Team
Counter-Strike 2 Hammer - Wall niches / doors / windows / tunnels, by ReDMooNTV
Lighting
Lighting helps to build an atmospheric and immersive world, it also plays a major role in the readability of your map. While the context changes from map to map, generally speaking this means that your lighting should strike a balance between being visually appealing and readable for gameplay.
light_environment for sunlight will in most cases provide adequate lighting, however it's worth trying different angles, brightness and color for the light to see what looks the best.
In shaded areas of your map, it may be necessary to incorporate a secondary light source to provide better visibility, however in doing so, it is recommended that the light is complimented by a source such as a candle or light bulb prop. The light_omni2 entity is standard for generic light sources. For more intricate light shapes you can use a light_barn or light_rect entity. To create dynamic lighting effects, within the object properties of the light entity, set the direct lighting type to 'dynamic' and set a 'style'.
4. Bad lighting
5. Good lighting
Adjusting the luminosity/brightness/fade of your lights will help to make your lights more convincing. Only use light ranges higher than 1024 units sparingly as this can negatively impact fps and compile times.
When testing your lights, changing your 3d view port to GPU Reference Path Tracing will provide a real-time raytraced preview of the lighting and reflections of your map in Hammer. This will allow you to adjust your lights without compiling your map. With that said, 3d All Lighting tends to present shadows more accurately.
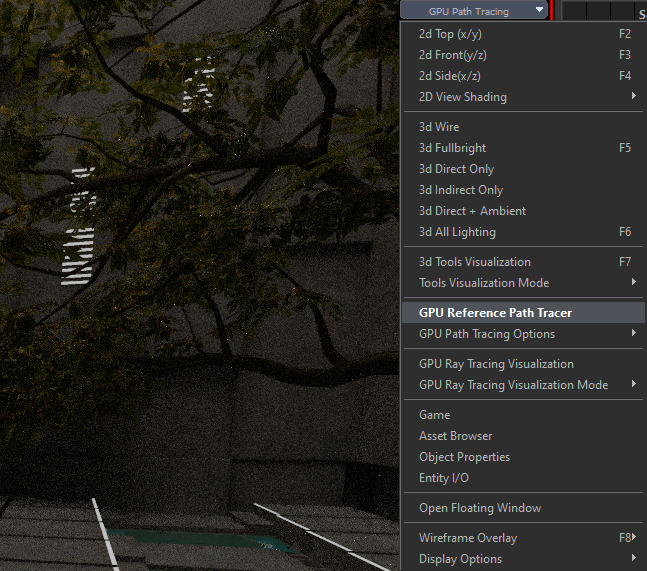
6. Enabling GPU Path Tracing in the viewport
WARNING
- Light and shadows may occasionally bleed through both merged and unmerged edges. This is a bug which often occurs for faces with sharp angles (less than 45 degrees), although it can also occur without an apparent cause.

7. Light bleed caused by unknown factor
Lightmap Resolution and Lightmap Space
The lightmap resolution of your map can have a significant impact on the outcome of your map’s lighting. Best practice is to always do a final compile for your map which by default is set to 2048 resolution. Below this resolution you are more likely to encounter lighting artifacts, especially in darker areas of the map. In larger maps with more light space it may be necessary to compile your map at a lightmap resolution higher than 2048.
8. Lighting artifacts due to low lightmap resolution
With this in mind you also want to avoid calculating lighting for areas of the map never visible to the player. The first step in achieving this is to cull lightmap space from your map by deleting unnecessary faces. Any face that will never be visible to the player should be deleted (assuming it is not contributing to vis). The second step is to incorporate a mesh with the toolslightmapres material. This is a tool material which tells the engine where to calculate high resolution lightmap space and will tell the engine where lightmap space should be prioritised.
WARNING
- Unexpected edges or lines on a surface, discolored textures and shadows without visible sources may indicate that a higher lightmap resolution is required.
- Lightmap artifacts are more frequent following the Cache update (even within Valve's own maps).
9. Edge on a surface clearly visible
Learn more:
Counter-Strike 2 Hammer - Basic Map Optimisations (compile time), by ReDMooNTV
Light probes and cubemaps
Light probes and cubemaps are required for your map and can be incorporated simultaneously with the env_combined_light_probe_volume (ECLPV) entity. Light probes are required to create diffuse lighting on entities which cannot utilize direct lighting such as prop_dynamic entities. Cubemaps are required to create proper reflections for material surfaces and your view model. This is achieved by projecting a three dimensional image of a room onto the surfaces within the bounds of the entity.
10. ECLPV absent
11. ECLPV present, but improper edge fade
12. ECLPV present
To implement lightprobes and cubemaps you should aim to place an env_combined_light_probe_volume in every room of your map. The origins of these entities should be positioned in the center of each room at player head height. You may need to adjust the position of the origin using the pivot manipulation tool (Insert key). For example if the room has multiple elevations, raising the entity origin to a height between the floor and the ceiling may create more accurate reflections. If an object is obstructing the ECLPV, ensure that the origin is not placed within or halfway through that object. After determining the location for the origin of the entity, the bounds should be extruded to encapsulate the entirety of the room. Recompile and you should now see reflections on your weapon models and the surfaces of your map.
In some instances a seam will appear between two ECLPVs due to a difference between the lighting of each room. To soften the transition between the ECLPVs, within the object properties assign an edge fade distance of 8 or 16 units (image 13). When applying edge fade, ensure the ECLPV edges overlap by twice the distance of your edge fade distance to maintain a smooth blend (image 15).

13. Combined light probe with fade and priority
14. ECLPV without fade or overlap
15. ECLPV with fade and overlap
When placing ECLPVs near walls, floors, or ceilings, extend the boundaries so the edge fade overlaps these surfaces. If the fade ends exactly at the wall, the lighting influence drops to zero, and the surface won't receive proper reflections or bounce light (image 11).
16. ECLPVs encapsulating the rooms with edge fade and overlap
Irregularly shaped rooms often force ECLPVs to overlap awkwardly through walls into adjacent spaces. This will occasionally cause surfaces to sample the wrong ECLPVs. To fix this use the priority system to "force" the correct ECLPV to take precedent (image 13). Usually, you’ll want the ECLPV that best fits the specific room's shape or lighting to have the higher priority.

17. A combined light probe "puzzle" with priorities mentioned
NOTE
When two or more env_combined_light_probe_volumes are set to the same priority, the engine will determine the priority based on the hierachy of the entity id.
Having multiple env_combined_light_probe_volume entities with custom “cubemap texture” can be buggy. Try changing the priority settings.
If a certain object is causing problematic reflections, the option "Render to Cubemaps" can be disabled in the objects properties.
WARNING
- env_combined_light_probe_volume can sometimes break. Try recompiling the map or replacing combined light probes until it works again.
- Do not rotate env_combined_light_probe_volumes (TEST!!!!!)
18. Broken env_combined_light_probe_volume
DANGER
- It has been suggested that edge fade may negatively impact performance, while we were not able to find clear evidence of a performance loss. Further testing could be conducted.
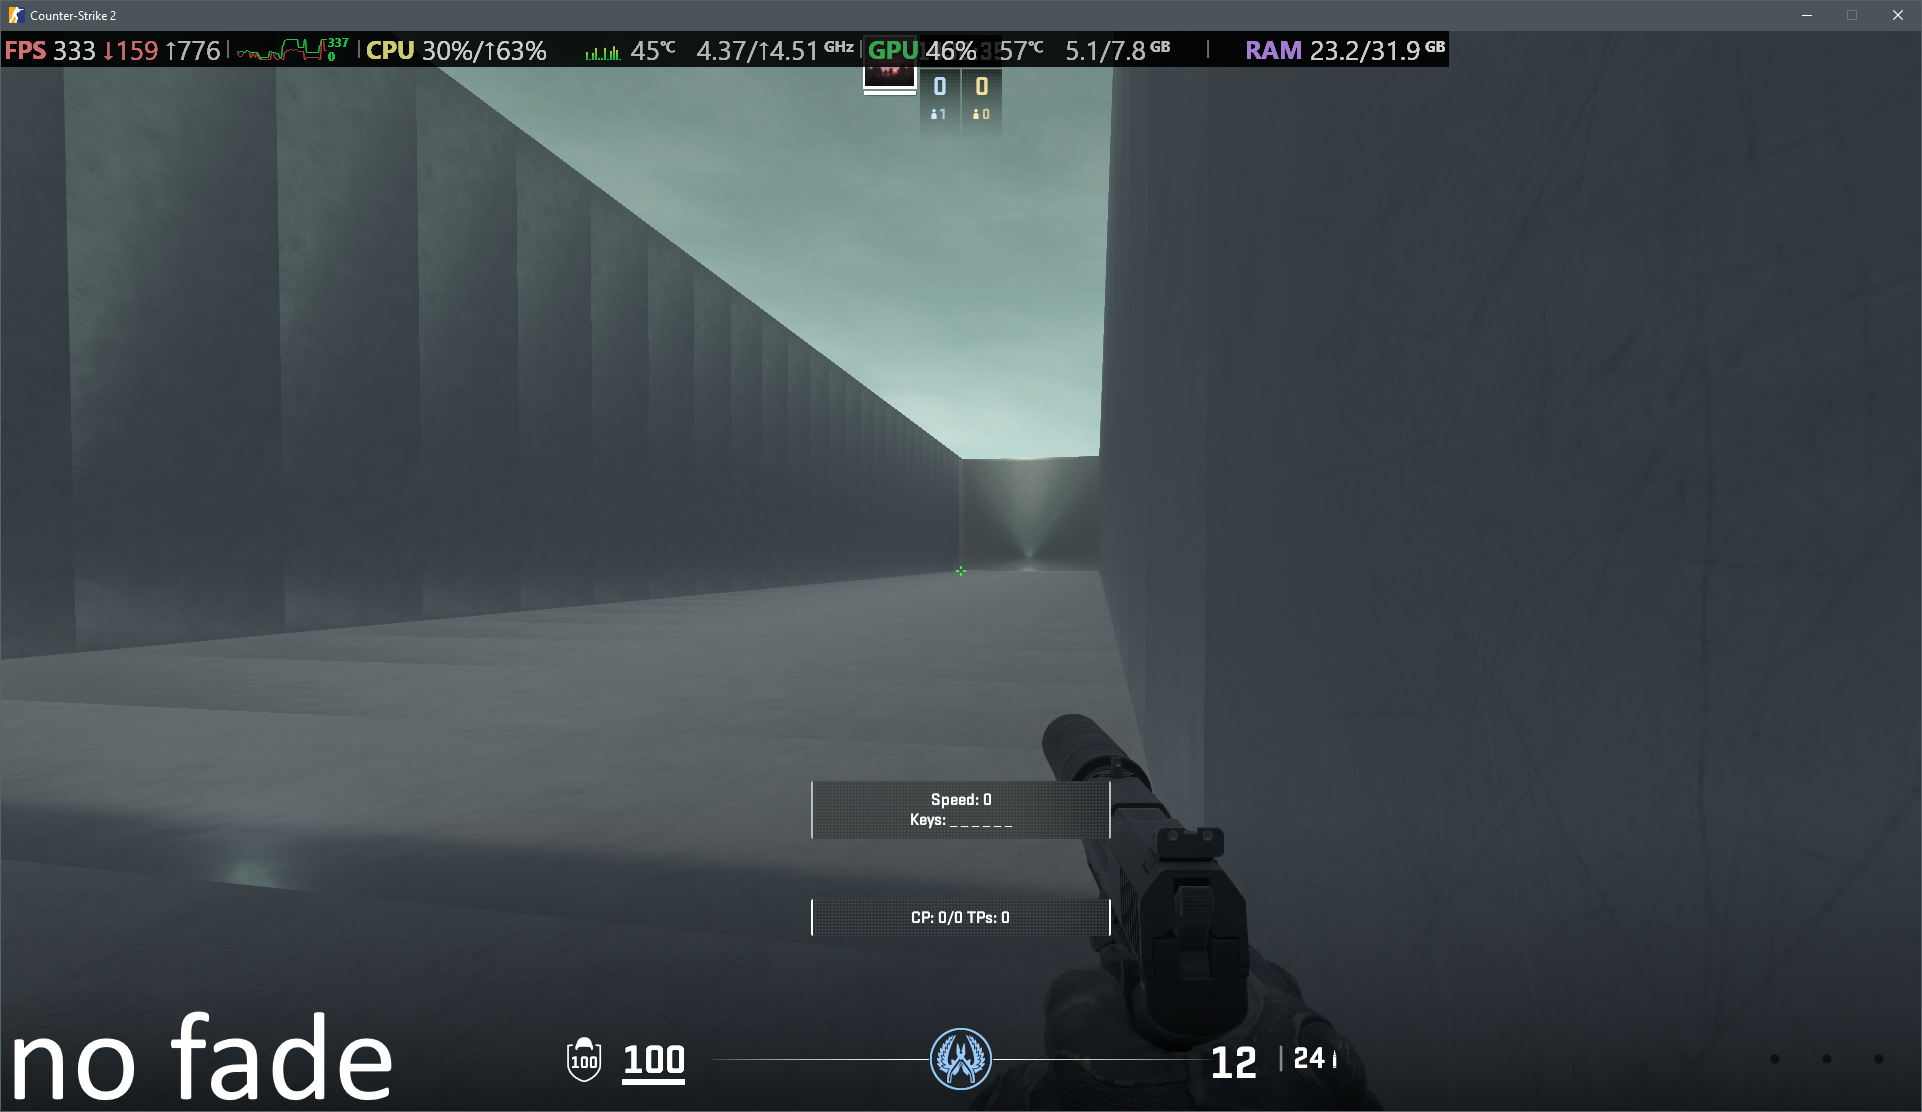
Open in a new window to enlarge:
19. ECLPV edge fade setup
20. ECLPV without fade or overlap
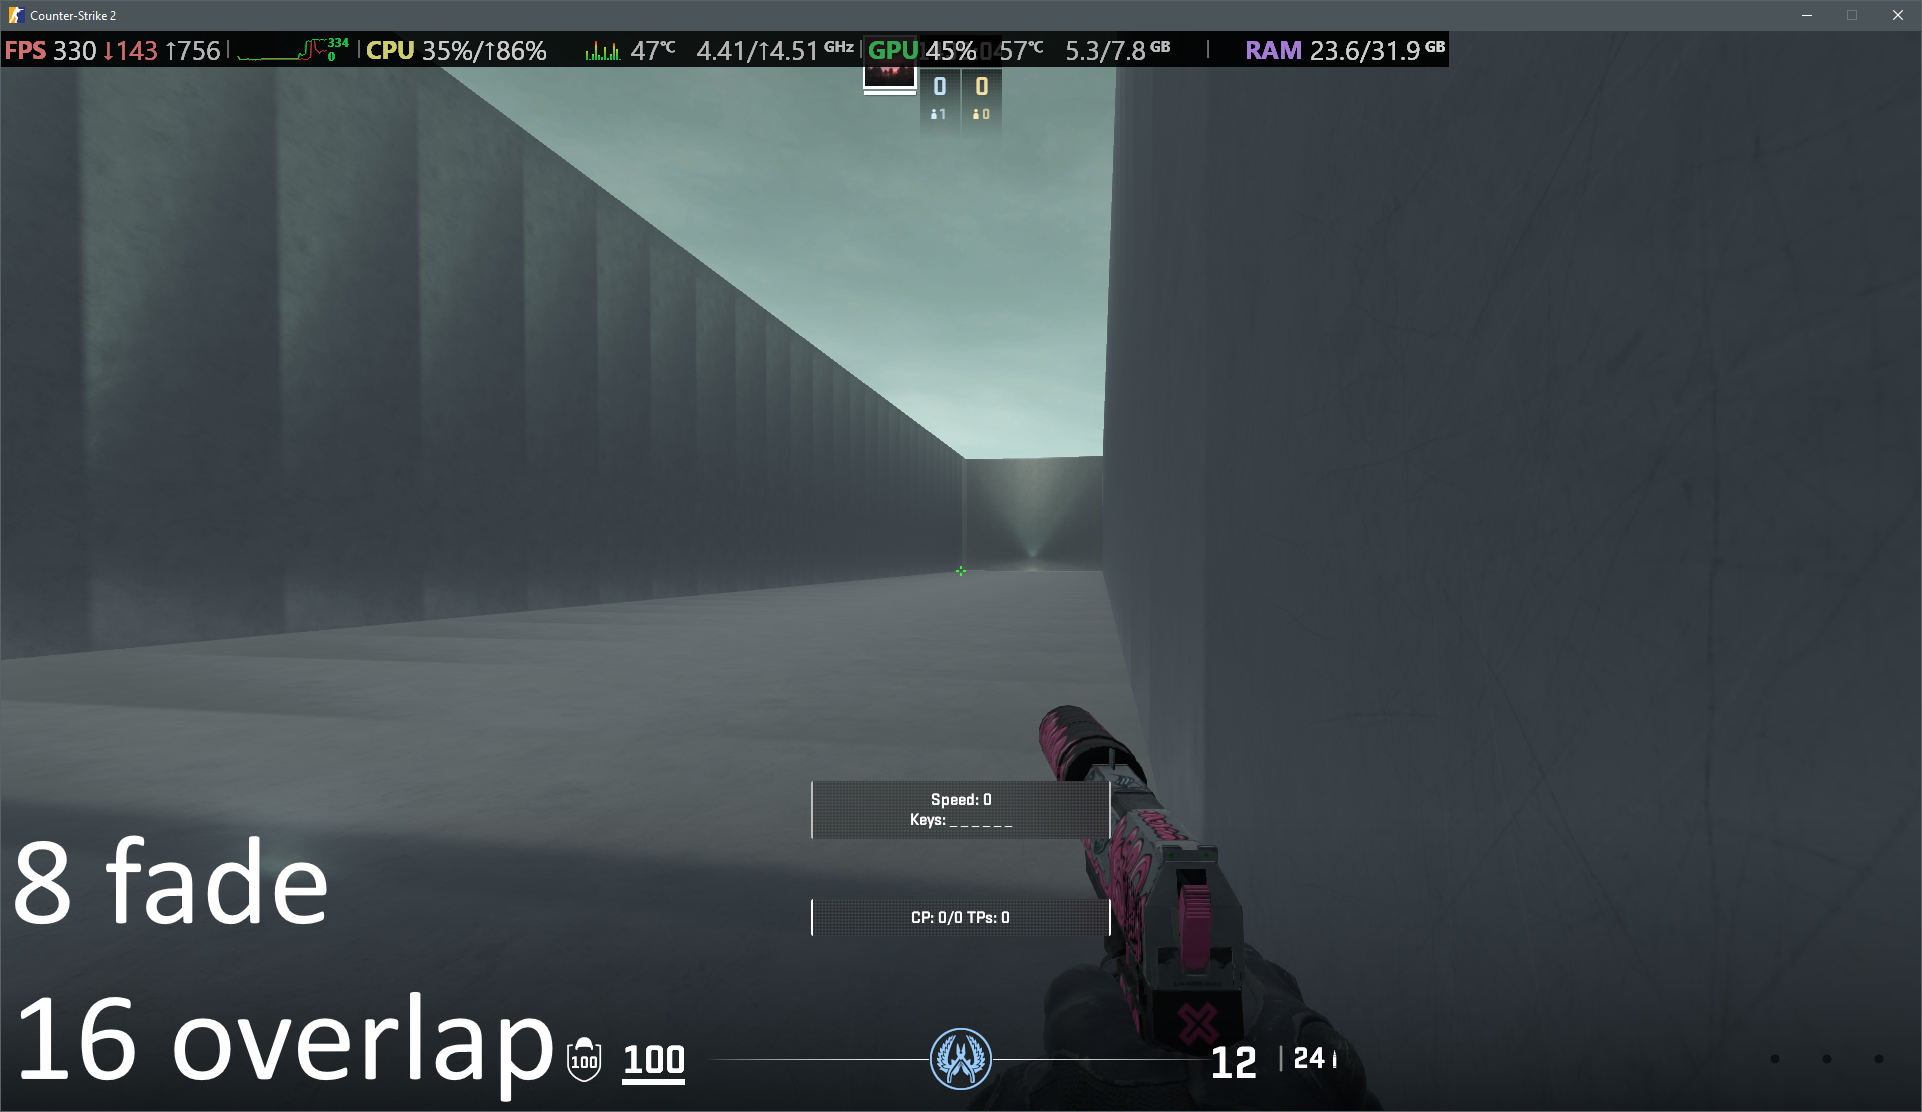
21. ECLPV with 8u edge fade and 16u overlap
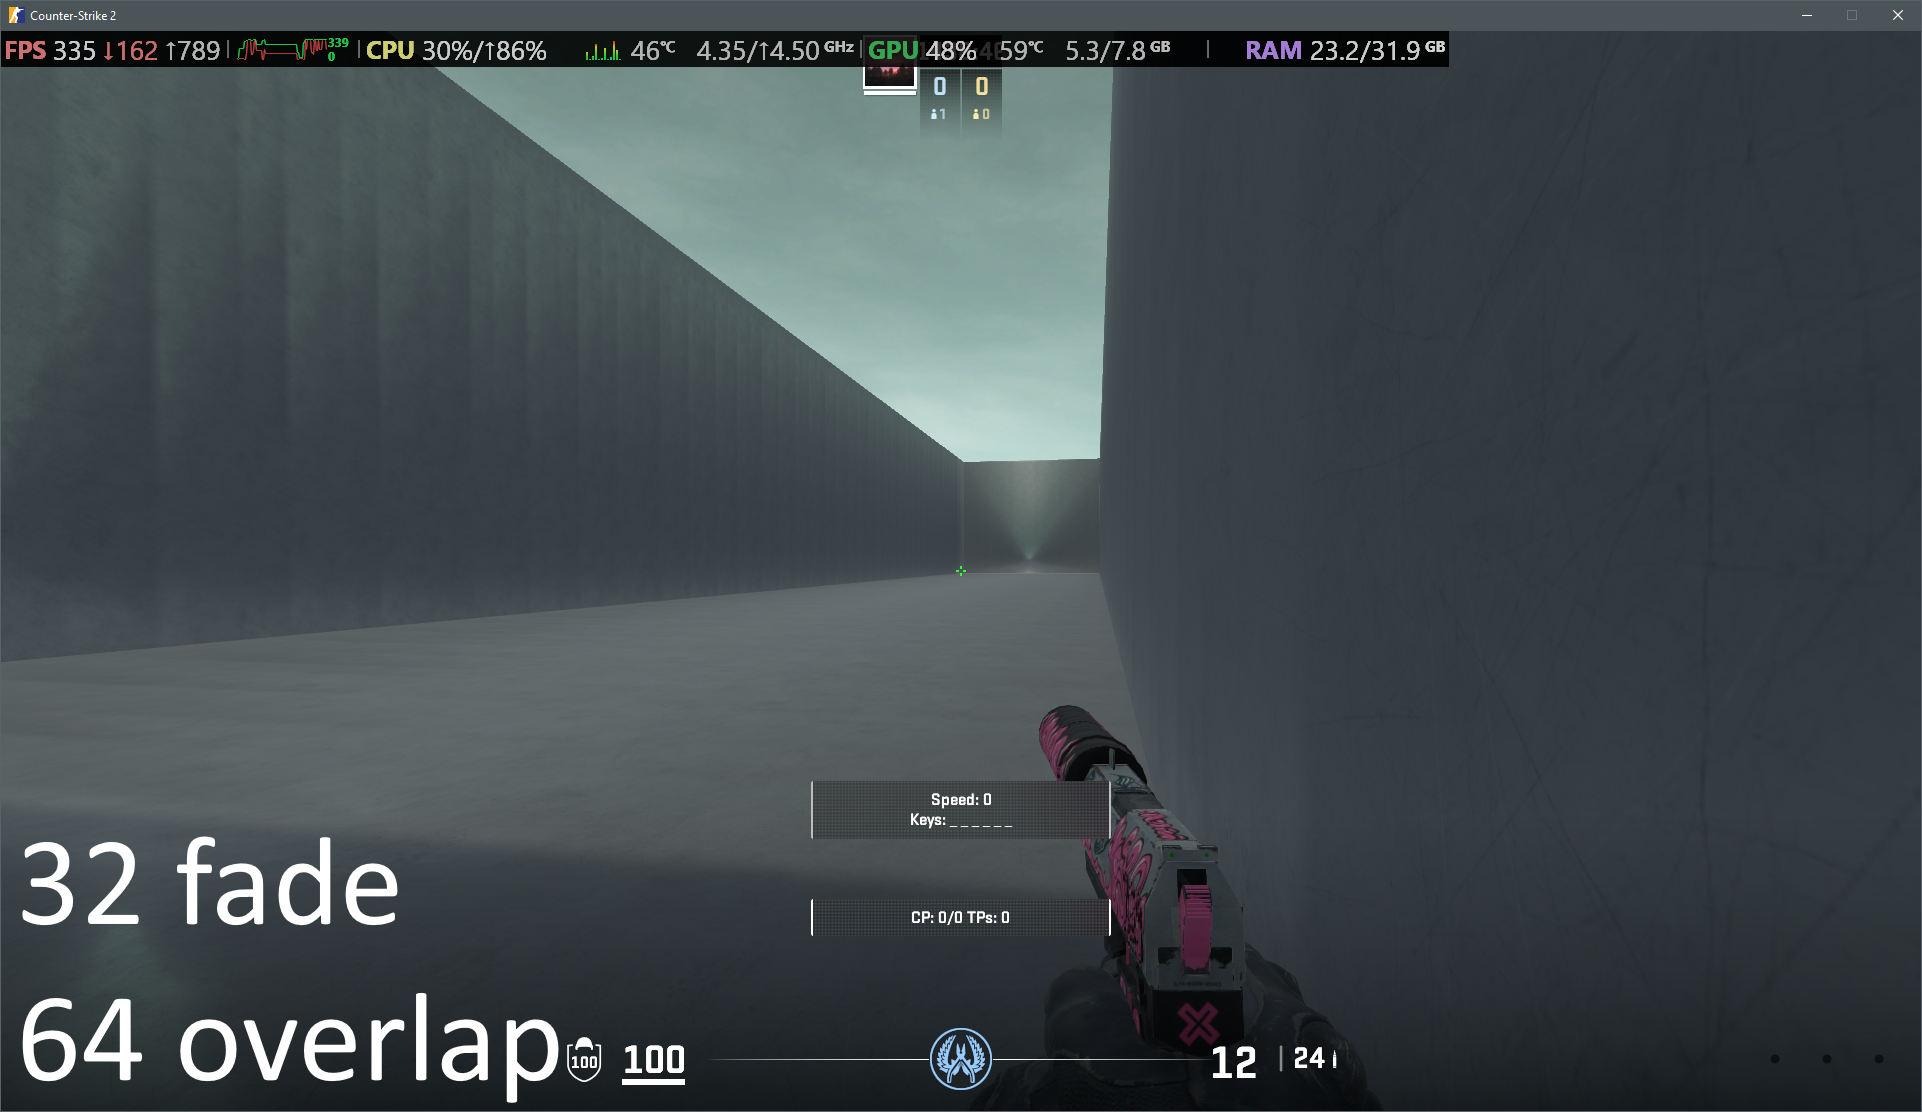
22. ECLPV with 32u edge fade and 64u overlap
VIS
The primary function of VIS (visibility) is to determine what is visible to the player from any given position. This is calculated during the map's compilation phase and, along with lighting, is one of the most resource intensive parts of the process. Poor optimization can cause compile times to skyrocket. VIS enables the engine to prevent rendering areas not visible to the player, ultimately improving FPS for the end user. It is therefore imperative that any surface which blocks a substantial proportion of your map from vision is being calculated for VIS.
In Source 1, visibility was managed by converting geometry into func_detail. Source 2 follows a similar logic, but the workflow depends on the asset type. While props are non-VIS contributors by default, mesh objects must be manually configured. To prevent a mesh from affecting VIS, you must enable the Not a Vis Contributor setting within the object properties.
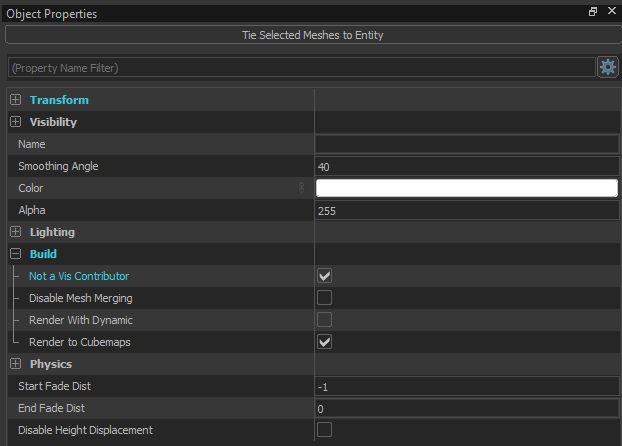
23. Object properties
VIS functions most efficiently with simple "boxes" and straight surfaces. Adding more complex geometry inside a room will therefore hinder this process. Detailed elements should be separate objects set as non-VIS contributors (image 23).
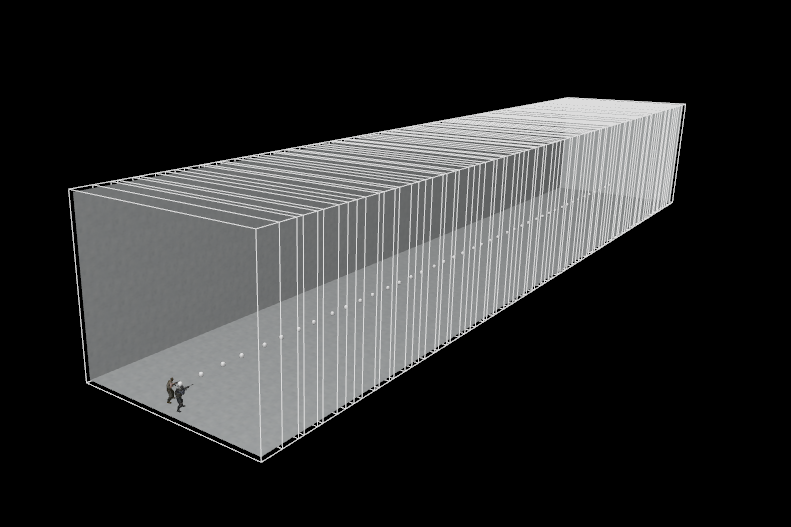
In technical terms, VIS operates using cubes called voxels. These voxels fill the playable space, "communicating" with one another to determine line-of-sight and visibility.
If these voxels get to the void (the empty space outside your map's sealed geometry), it will cause a VIS Leak. When a leak occurs it often results in objects rendering in and out of view. Ensure your outer "shell" is perfectly sealed and voxel sizes are kept to a minimum to keep the VIS contained. Any VIS contributor face that points outside of the map is a VIS leak. VIS can also affect shadows and lightning on your player model.

24. VIS leak
VIS bugs are similar to VIS leaks but on a much smaller scale. For example when a voxel covers two adjacent rooms causing geometry to render between them.
The entity visibility_hint allows you to manually control the size of these voxels in specific areas. While using larger voxels can significantly reduce your compile times, you must be careful, if they are too large, they may fail to properly respect your map's boundaries and bleed into other rooms or the void, resulting in a VIS leak. Larger, open maps such as infinite water maps can use higher voxel sizes.
To visualize how the engine is "thinking," you can view these voxels directly in Hammer. Navigate to the Map dropdown menu and select Load Compiled Vis Data. This will overlay the voxels clusters onto your 3D view, allowing you to identify areas where the density might be too high or where voxels might be leaking.
To visualize which objects in your map are currently affecting visibility, click the Visibility contributors view button located in the toolbar (see image below).

25. "Visibility contributors view" button
26. kz_kuutio
27. kz_kuutio with only VIS contributors
NOTE
- Given you have the core geometry of your map finished, you only need to calculate VIS once to compile your map. This allows you to reduce compile times substantially when testing non-VIS related elements. However, making any change to the core geometry of your map will cause your map to leak. To resolve these leaks you should recompile VIS.
WARNING
- The
toolsnodrawmaterial should not be used to 'seal' your map like you would in Source 1. This will cause a VIS leak. - Whilst the
toolsskyboxcan still be used to seal the sky of your map, this material no longer occludes objects outside the world mesh. If required you will need to use create and employ a new material with theCsgo Moondomeshader using the same skybox texture as yourenv_skyentity.
Learn more:
Counter-Strike 2 Hammer - Basic Map Optimisations (compile time), by ReDMooNTV
CS2 Mapping Academy #10 - VIS Optimization (Counter Strike 2), by Eagle One Development Team
Visibility, by Valve Developer Community
Texturing
Textures can turn raw geometry into a living breathing world. Fortunately making your own textures is easier than ever with Source 2 offering far more intuitive and complex texture manipulation. This provides you with an opportunity to develop a unique style which will make your map stand out from others.
While there are no standards for the aesthetic of your map, there is an expectation that your textures should not impact visibility and maintain a degree of cohesion. Try to keep a consistent resolution for each texture where possible, align patterned materials with adjacent patterned materials, and ensure surfaces adopt their expected properties (walking on grass should sound like grass).
NOTE
- Valve assets can't be edited without decompiling them first.
Custom Texturing and Materials
Custom textures and materials can be added to your addon using the material editor. To add a new texture/material you will need to create a new .vmat file. To create a .vmat file simply open the material editor, press new and save the file within the CONTENT path like: Counter-Strike Global Offensive\CONTENT\csgo_addons\YOUR_ADDON\materials.
You must save the file before you can edit it!
The list of properties to choose from will vary depending on the shader type you choose. If you wish to change the shader you can do so and re-save that vmat without having to create a new one.
Opening the variables tab allows you to change the interactive properties of the material including the sound of footsteps and bullet impacts. Select material type and search through the list of available surfaces until you find an appropriate choice.
NOTE
- Most material properties update in real-time. This means you can adjust your material in one window while viewing the result in game from another window.
WARNING
- Texture resolutions must be a power of two (e.g.,
1024x2048,1024x128or2048x2048). Supported file formats includeJPG,PNG,TGA, andPSD. - Texture resolutions should be capped at
2048x2048to optimize file size.
Missing materials now cause users to crash on secure servers. A recent 'safeguard' change from Valve. This usually occurs when you assign a material to a face, then delete that material from your addon folder or don't place it insideCounter-Strike Global Offensive\content\csgo_addons\YOUR_ADDON\materials.
This will not crash your client when running a listen server in insecure mode making it easy to miss until your map is tested on a dedicated server.
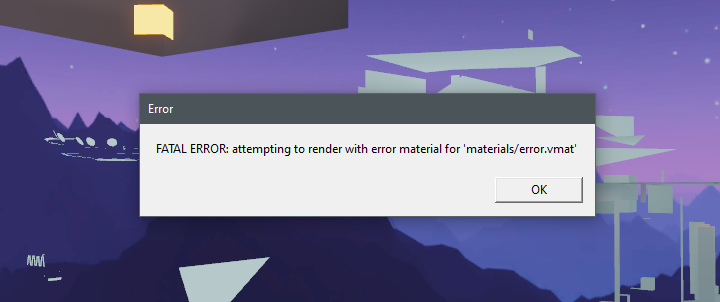
28. Crashed game caused by missing material
Learn more:
PBR Explained in 3 Minutes - Physically Based Rendering, by GarageFarm Academy
Counter-Strike 2 Hammer: Custom Textures / Materials (PNG images), by ReDMooNTV
Useful shaders
Material shaders are different customizable configurations for materials each with varying properties and functions. Here we have listed some of the more useful ones with tips on how to use them.
Csgo Environment
This shader allows PBR layering for generic materials such as wall, floor and terrain surfaces.
Although only a color/texture file is required for the shader to function, you should aim to generate normal and roughness maps at a minimum to provide your materials with realistic topography and surface reflectivity.
If you’re planning to use a material texture which lacks other PBR layers, you can generate them yourself. For those who want fast results you can quickly generate these layers from a color/diffuse texture using NormalMap Online or Materialize.
You can also generate the layers manually using an appropriate photo editing software such as Gimp, Photoshop or Blender.
Csgo Environment Blend
The Csgo Environment Blend shader allows you to combine two materials and create smooth transitions between those materials with the Blend Painting Tool (Shift+V). You can also add a wetness layer if you wish to create a blend between a wet and dry surface. To use blend materials, assign the custom blend material to a face, select that face and then change to the Blend Painting Tool. Within the tool settings, change "Paint On" to selected faces, then on the selected face you can click to paint. If you wish to switch to the alternate material, hold ctrl while painting.
NOTE
- Increasing the subdivision on a face will allow finer strokes with the paint tool but may force uneven results for surfaces with complex geometry. As an alternative method, you can manually cut edges on the face to the shapes you desire and with the paint tool
Flood Fill.
Csgo Water Fancy
If you don’t plan on adding water to your map you can ignore this shader. If you do, it is imperative that you create a custom water material rather than using the stock assets.
The easiest way to prepare a water material using this shader is to decompile a water material already available in the game. This will allow you to see how the shader properly functions.
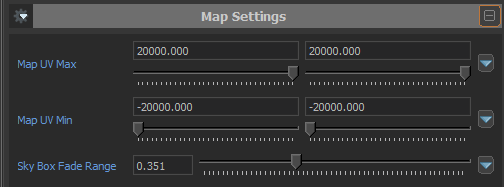
Most people’s first issue when using stock water is that the surface starts to fade the further it is located from the world origin. To adjust the fade distance, change the Map UV Max and Map UV Min.
Csgo Complex
The Csgo Complex shader offers experimental properties for your materials such as emissive lighting, transparency, animation and movement.
To create Neon/Glowing/Illuminated materials with the “Csgo Complex” shader tick the “Self Illum” box. Scroll down and set the “Self Illum Mask” to white. Play around with the “Brightness” and “Albedo Factor” slider.
With glowing materials it's important to remember that it will cause light artifacting VERY easily if the light is mainly coming from Self Illum materials. Thats why it's recommended to disable "Emissive Lighting" under the mesh properties. Emissive in this case means that it reflects light from itself onto other things (it's bad)
To make the glowing material appear as “glowing” (without as many problems) a combination of postprocessing (with bloom) and the use of light entities is recommended. Good light entities for this case could be “light_rect” and “light_omni2” with either a sphere or one of the tubes as a light shape. Remember that less light entities are better than many.
WARNING
- Emissive materials can cause light artifacts. Using emissive materials as your primary light source often results in "noisy" or splotchy light artifacts, especially in dark environments. Disable
Emissive lightingand instead use postprocessing bloom and light entities.
29. Light artifacts caused by an emissive material being the main light source
Transparent materials can also be made with the Csgo Complex shader. Just tick the “Translucent” box and configure it. For this you will need an alpha mask.
Csgo Static Overlay
Can be used to project materials onto faces. The best use case for this would be images/art/lj numbers. This shader does also have the translucent option.
Why does this differ from just making a face with Csgo Complex? Well because faces tend to glitch out when viewed from further away, this doesn’t happen with overlays, as seen in the gif below.
30. Overlay and face comparison
Sky
Used for making custom skybox material. The “Sky Texture” can be added in multiple different forms. The preferred and best looking one is as an .exr file with HDR. This will however use the most file size.
The Dxt1 (LDR) option can be used if the skybox image isn't HDR. This option uses less file size. Use this option if your skybox is a simple .png image.
If your skybox has six faces (back, down, front, left, right, up), you need to convert it to a Cube Map format as seen in the image below. They can be puzzled together in image editors.
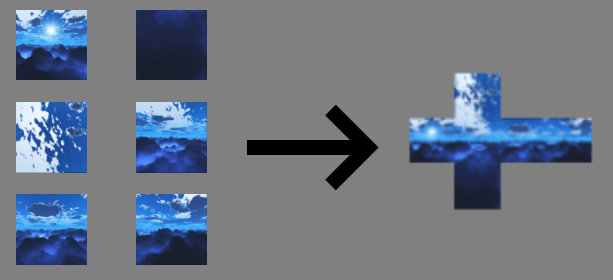
31. CS:GO skybox faces turned into a CS2 compatible skybox Cube Map texture
Csgo Moondome
Moondome is used because toolsskybox doesn’t work properly and renders things behind it. Moondomes are basically a material shader that acts like a proper skybox material. Keep in mind that it has a hitbox by default but this can be fixed by changing the Surface Property to Default Silent in the Attributes tab. This makes the moondome act like a clip by not having a hitbox but still acting like a wall that can’t be passed. "Cube Map texture" is the same texture as used for Sky.
WARNING
- When making moondomes it’s important to keep in mind that the Color setting is set to gray by default and should be changed to white to not have the moondome darker than the skybox.
Refract
It's broken as this is being written. Has to be rendered as a model through a info_particle_system entity.
Needs FidelityFX Super Resolution video setting disabled to show without visual bugs.
Csgo Weapon
Can be used to make very interesting materials by enabling the SFX options Glitter and Iridescence. This shader does in fact work on other surfaces than weapons.
Csgo Simple 3layer Parallax
Can be used to make fake rooms and layered materials such as ice. Check out this video to learn more.
Csgo Composite Generic
Used for loading screen images. The option A is the only one needed.
Csgo Lightmappedgeneric
Coming from Source 1 you may have used the LightmappedGeneric shader for your generic materials. While this shader is still available in Source 2, it should only be used sparingly as it lacks many of the features and fidelity offered by alternative shaders.
Particles
Particle effects such as fire, water ripples and dust motes can be added to your map with an info_particle_system entity. While some stock particle systems are available, many will require tweaking within the particle editor to function.
By default the particle editor is soft locked for fresh installations of Hammer. The CS2KZ Mapping api enables the particle editor. If you are not using the Mapping API follow this tutorial to enable the particle editor.
If you're interested in learning more about particle systems, we recommend decompiling a Valve particle system or custom asset and exploring its properties within the particle editor.
WARNING
- Adding an excessive number of particle systems or systems with high emission rates can significantly impact performance.
- Use
Render omni2 lightssparingly.
Sounds
Good luck! Sounds are notoriously difficult to implement at the moment.
WARNING
- Despite what some tutorials have suggested, the ambient_generic entity still functions.
- Spawning inside of an env_soundscape will not activate the soundscape. You can resolve this issue by moving the env_soundscape radius slightly ahead of the player spawn point.
- Looped soundevents will deactivate if the player leaves the audible radius. To resolve, either increase the radius or have a trigger restart the sound within the audible range.
- Sounds which are triggered outside of the audible radius will immediately stop playing on dedicated servers.
- On dedicated servers when a trigger is employed to play a sound from an ambient_generic entity, if the trigger object is triggered more than once, the sound will stop and become unplayable for the rest of the game session.
Learn more:
Counter Strike 2 Audio Academy, by Eagle One Development Team
Custom Sounds on Hammer, Counter Strike 2, Source 2 full guide, looping sounds tutorial, area based., by Brian Vuksanovich
Nice to haves
1. Team Selection
Adding a team_select entity to your map will add team selection scene to your map. This is an opportunity for you to display the most cinematic perspective of your map when players first load in. You can place the entity at any location and rotate the entity to get the best angle.
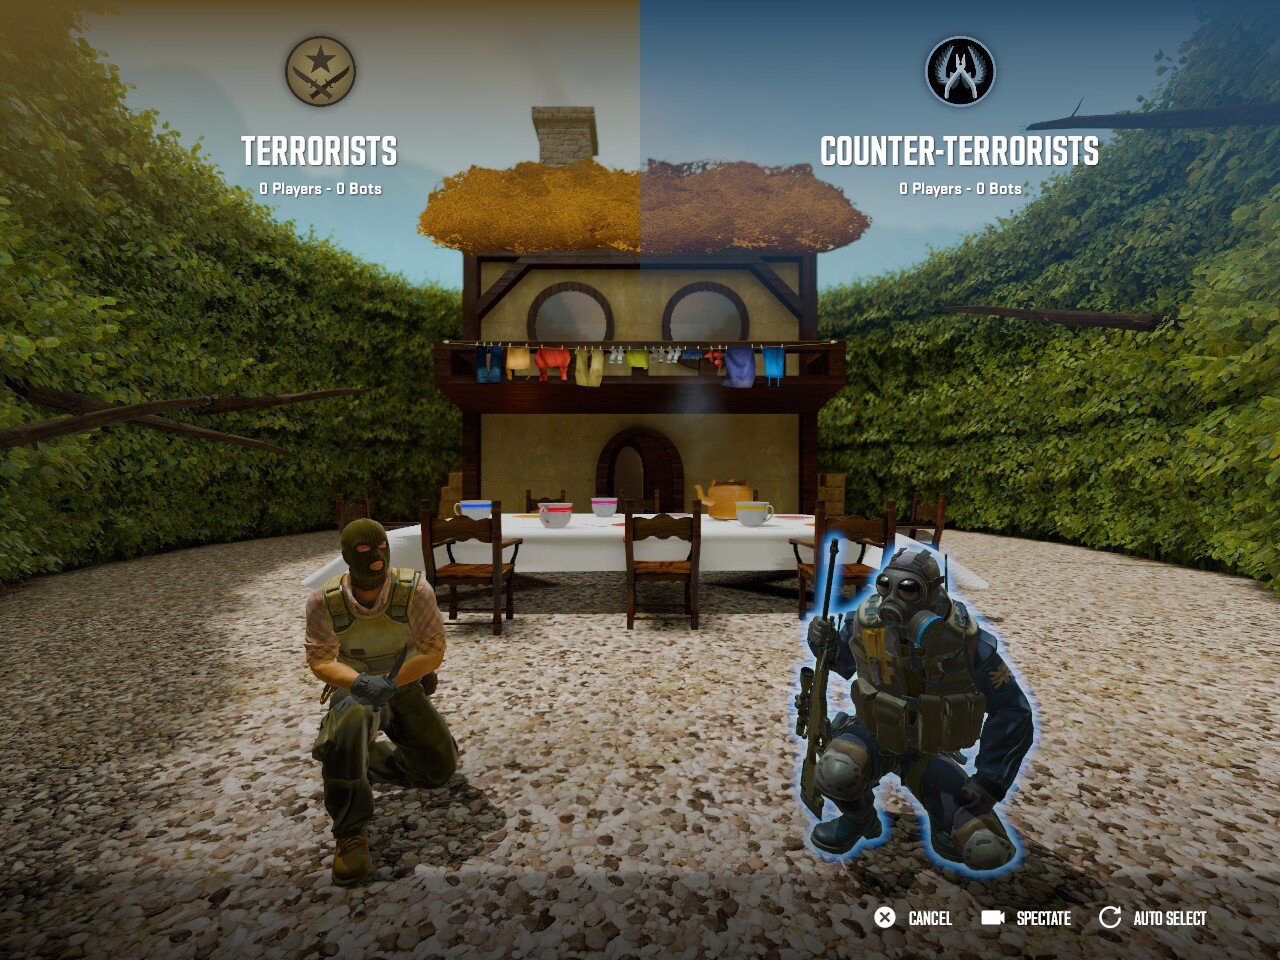
33. kz_madhatter team select screen
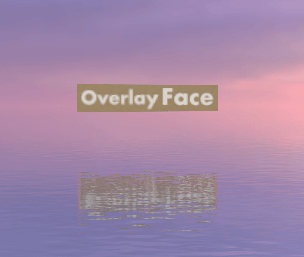
2. Custom loading screens
Custom loading screens, map icons and description can be added to your maps as a final touch with a hint of professionalism. You might like to add some nice screenshots of your map, credits for contributors and an icon representing yourself as the author.
WARNING
While you can have a maximum of 10 loading screen images, this will increase the size of your map file.
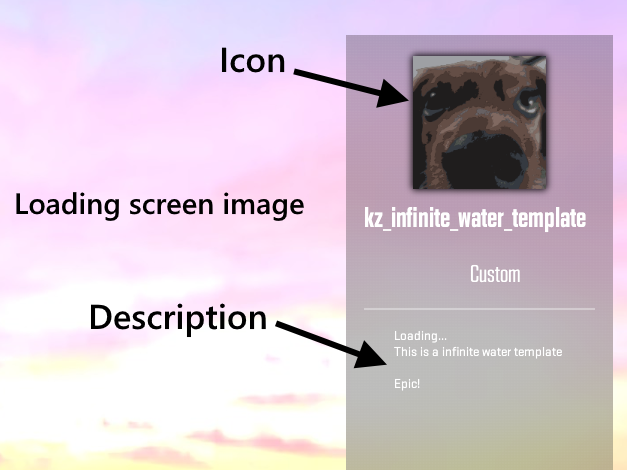
34. Custom loading screen
Learn more:
Change Loading Map Screens in Counter Strike 2, Hammer Mapping tutorial, Source 2 guide., by Brian Vuksanovich
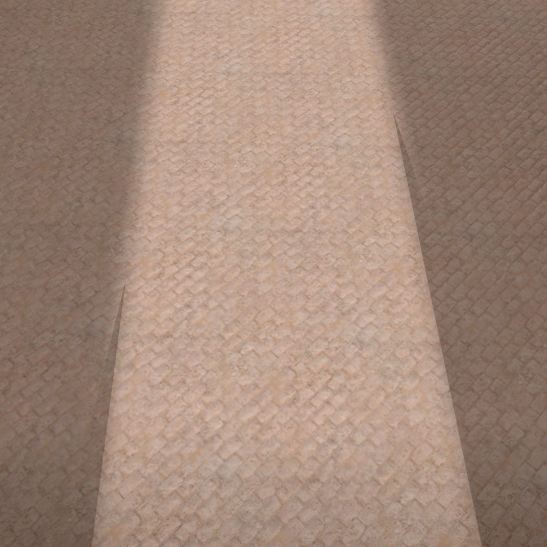
3. Gradient Start & End zones
Start and end zones should be clearly visible to the player. A self-illuminated gradient texture is an effective way to indicate these zones and other triggers the player may interact with.

35. Start and End zone
- Download the "Gradient" image below and place it inside:
Counter-Strike Global Offensive\content\csgo_addons\YOUR_ADDON\materials

36. Gradient
Create a
Csgo_Complexshader material withTranslucentandRender Backfacesenabled.Add
gradient.pngas the translucent layer.Enable
Self Illumif you want it glowing.Create the object.
The material looks best when the shapes top and bottom faces are removed. The face's top edge can be cut off because it renders a line.
Disable collision and VIS contribution in the object properties.
NOTE
- Rather than tinting/coloring the material in the material editor, you can adjust the color of the object in the object properties.
4. Custom postprocessing
You can adjust you visual athmosphere further on your map, with postprocessing.
To do this, open the Postprocessing Editor and create a new .vpost file. Save it to CONTENT\csgo_addons\YOUR_ADDON\postprocess. Once saved you can add different postprocessing layers to the file. Create a new mesh in your map and tie it to a post_processing_volume entity. Then in the object properties set Postprocessing file (.vpost) to the .vpost file just added. Once compiled your map will inherit the postprocessing layers from the .vpost file.
NOTE
You can have postprocessing limited to the volume of the mesh or encompassing the entire map by enabling Master Volume.
By adjusting the postprocessing layers in the Postprocessing Editor, you can view the changes in real-time.
Check out these https://codeberg.org/GameChaos/s2-open-domain-lut-generator/tags
Miscellaneous issues/bugs
1. Backface shadows
Following the Animgraph 2 update, certain faces now draw false or incomplete shadows. This may occur when a surface is removed for optimization purposes or a shadow is casted from one face behind another. While the toolsblocklight material is intended to resolve this issue, it does not work in all cases since the sharpness and opacity of this material scales with lightmap resolution.
37. Blocklight shadow fades as the lightmap gets more populated
If you have removed a face from an object to save lightmap space, and that object is drawing incomplete shadows, replace the face. Then select the replaced face and reduce the Lightmap Resolution Bias to -4.
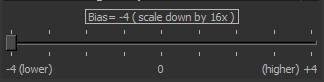
38. Lightmap Resolution Bias
In situations where a shadow shouldn't be visible. First attempt disabling shadow casting for the problematic object. If the face casting incorrect shadows is a VIS-contributor you will need to make a "dummy face". First retexture the surface of the problematic face with the toolsnodraw material. Then create the new dummy face by copying the original face and using paste special (Ctrl+Shift+V). For the new dummy face, within object properties enable "Not a vis contributor", disable shadow casting, and retexture the material to match the original surface. Be careful to ensure you do not disable VIS contribution for the world mesh.
39. Broken backface shadows
40. Broken backface shadows
41. Broken shadows
42. Fixed shadows (added non-VIS faces with -4 lightmap bias)
2. Slide triggers need to be wider and taller, especially on smaller blocks to ensure proper contact.
Due to latency, slide trigger meshes should be larger than the associated blocks intended to be slided on. This prevents the 'slide' effect from registering late and nerfing the speed of the player. Simply extend the width of your slide triggers to overhang the blocks and raise the height of the trigger as much as possible relative to the confines of other gameplay elements.
3. Func_brush tends to act weirdly.
Use with caution. Some porting tools improperly convert func_brush entities into invalid geometry leading to extremely long or impossible compilation times.
4. Having multiple .vpk files packed
Compiling a renamed map creates a new .vpk. To prevent the game from defaulting to a previously compiled version based on alphabetical priority, remove all redundant .vpk files from the /GAME directory.
5. Missing assets
Ways of finding or fixing missing assets:
- Map -> Check Map For Problems.
- The console command
mat_print_error_materials. - Fixing FATAL ERROR: materials/error.vmat, by sarim
- Remove things until it works.
43. Missing texture
44. Broken post_processing_volume due to a missing .vpost file
NOTE
- Missing materials can be difficult to find when used in models.
6. Custom fonts won't be packed into the workshop map.
For example custom fonts used with point_worldtext. No fix available for now.
7. 3D Skyboxes need to be recompiled to update in the main map.
8. When following online source 2 tutorials, be aware that some methods or entities may not work in the CS2 version of Hammer.
For example, volumetric_fog is unavailable in CS2 but available in Half-Life: Alyx.
Tips and tricks
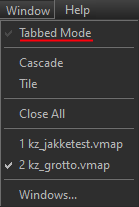
1. Enable Tabbed Mode in "Window" to easily swap between .vmap files.
45. Tabbed mode
2. Use instances
Instances are ideal for repetitive elements or objects that are copy-pasted throughout the map. Using them keeps your project organized and allows you to make global changes to all copies simultaneously by editing a single object.
To create an instance, select your objects, right-click, and choose Selected Objects and Create Instance or use the shortcut Ctrl+Shift+G.
Instances have to be edited inside the instance editor by double clicking the instance object.
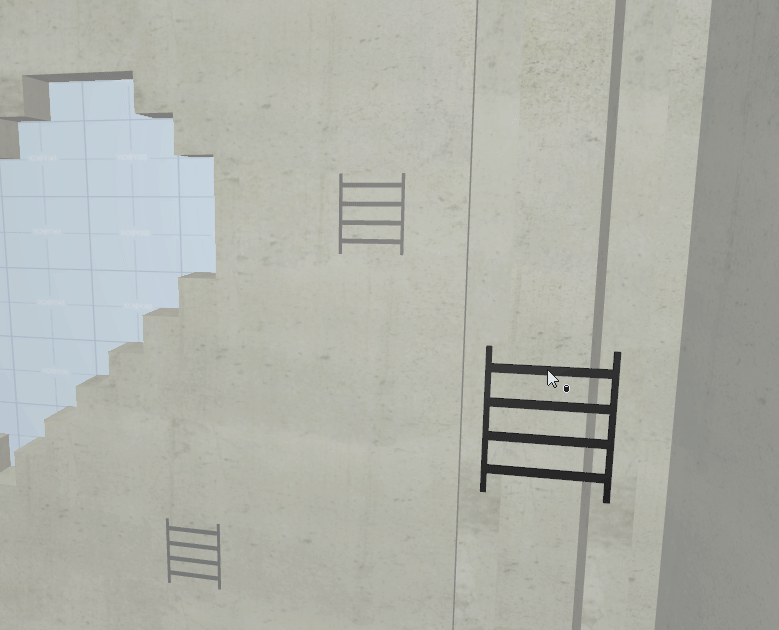
46. Ladder instance
3. Group objects
Allows you to select multiple objects at once. Select objects and press Ctrl+G. To ungroup do Ctrl+U.
4. Remove unused compiled assets
Before publishing a workshop version remove the compiled /materials and maybe /models folder.
Then re-open Hammer and reload the map.
This causes Hammer to only compile used assets, otherwise it would pack everything ever compiled to the workshop version (even assets not used anymore).
NOTE
- Assets are compiled when viewed in Hammer.
DANGER
COMPILED FILES ARE FOUND IN THE
/GAMEPATH AND NOT THE/CONTENTPATH.FOR EXAMPLE:
Counter-Strike Global Offensive\GAME\csgo_addons\YOUR_ADDONIT IS RECOMMENDED BACKING UP YOUR ADDONS
/CONTENTFOLDER BEFORE TRYING THIS.
5. Decompiling maps
Especially on larger maps, scroll through the assets in the material browser before opening the .vmap to prevent very frequent crashes.
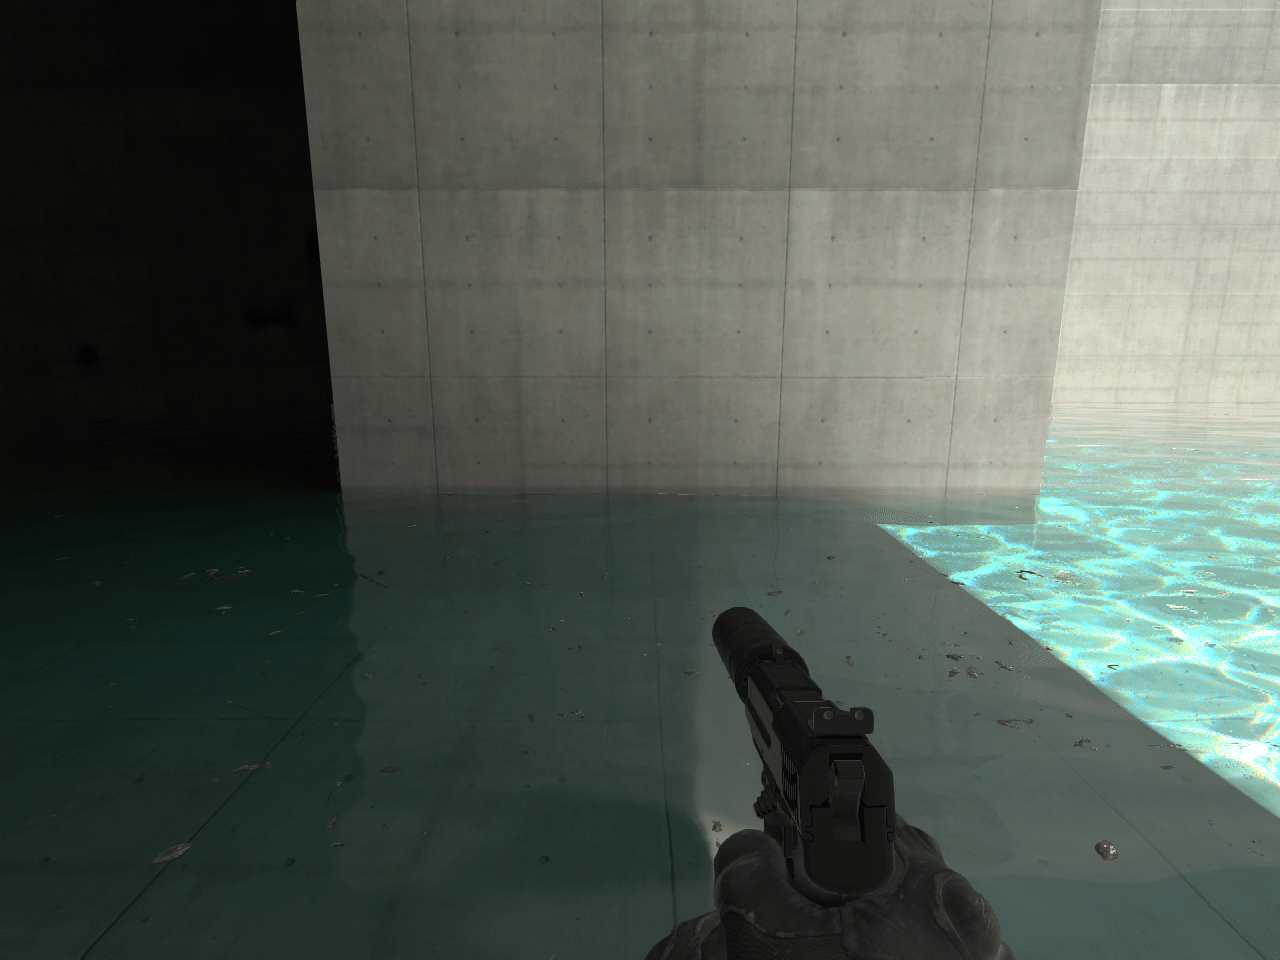
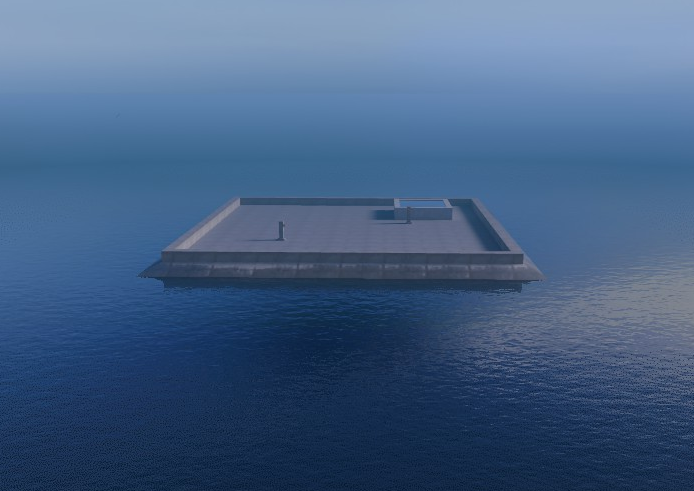
Infinite water
The infinite water setup has changed significantly since CS:GO, largely due to how it interacts with env_combined_light_probe_volumes. To get it looking right, keep these points in mind:
Larger Water Surface: The water area needs to be much larger than in CS:GO. This hides bad reflections and gives the edge fade distance to blend out smoothly.
Light Probe Coverage: Depending on your layout, a single large light probe is usually best. Never let light probe edges sit on top of the water, as the seams are incredibly obvious on reflective surfaces such as water.
Always center your water origin on the grid. Water will stop rendering entirely once it reaches 20,000 units from the origin on any side.
3D Skybox Transitions: Since the main map renders over the 3D skybox, ensure your main map geometry does not sit within the water's fade range. This prevents the "seam" between the real world and the skybox from becoming visible.
If your map has a low perspective and players cannot look directly down onto the water, you can get by with only water fade.
If the reflections from your env_combined_light_probe_volume look messy, identify the specific objects causing the issue. You can disable "Render to Cubemaps" on those individual entities to prevent them from being captured in the reflection, which often cleans up the final look.
Diving deeper
If your map is tall (for example kz_avalon) the edge between the main map and 3d skybox is going to be noticeable, mostly due to env_combined_light_probe_volumes.
Workarounds for this includes:
Replacing the env_combined_light_probe_volume “cubemap texture” with the one from the 3d skybox.
- In the 3d skybox map right click your env_combined_light_probe_volume entity and “Write Custom Cubemap…”, then select this
.vtexfile in the main map. If this is done, remember to set this env_combined_light_probe_volume’s priority lower than other, otherwise other env_combined_light_probe_volumes on the map will bug out.
- In the 3d skybox map right click your env_combined_light_probe_volume entity and “Write Custom Cubemap…”, then select this
env_combined_light_probe_volumeconfiguration- The sphere should be roughly on the same height and placement in both of the maps (3d skybox and main). You can move the sphere with the “Pivot Manipulation tool”
- The env_combined_light_probe_volume should be larger than the playable area (image 48)
Water Configuration
- Water can only be configured on new/decompiled water materials.
- SSR
- Right now SSR might be the best solution for reflections on these maps.
- Downsides include:
- Reflects what the user sees (no undersides or backsides for example)
- Things moving off the camera will flicker and get distorted
- SSR has a lot of configurable values in the material editor after being enabled.
- Water Fade
- The idea of water fade is to help with the transition between the main map’s water and the 3d skybox’ water.
- These sliders configure the waters fade:
47. Water fade sliders

48. kz_avalon setup (if toolsskybox worked as intended the skybox would probably have to cover whole main map's water)
Other settings such as reflectance and glossiness can also help with the transition but it makes the water uglier.
Fog can help cover the fade but adds a radius of fog which is quite noticeable at higher elevations.
49. word's infinite water tutorial, discord link
50. jakke's infinite water template, discord link
WARNING
MSAA multisamplingoptions render a line at the horizon.CMAA2andNonework fine.
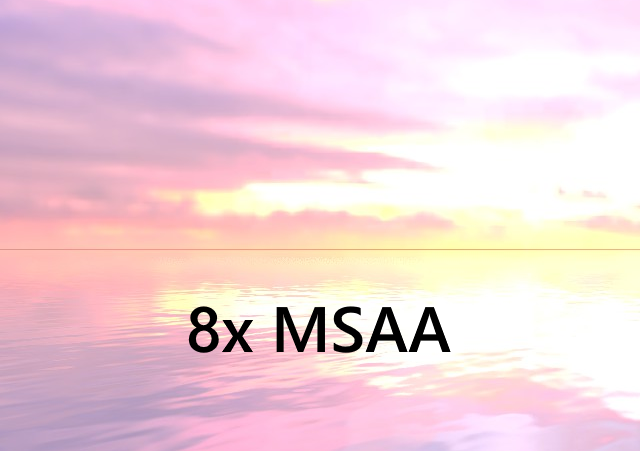
51. Infinite water with 8x MSAA setting
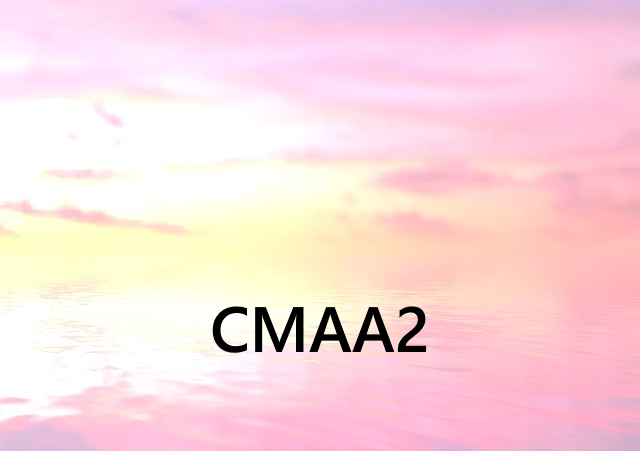
52. Infinite water with CMAA2 setting
Useful resources
- CS2KZ Mapping: Scripts for setting up and launching Hammer with CS2KZ plugin made by zer0.k
- CS2KZ Mapping API: Documentation for CS2KZ mapping api.
- Source2Viewer: Tool for decompiling CSGO and CS2 assets from vpk packages.
- Valve Developer Community: Official Source Engine wiki.
- Source2 Wiki: Community wiki for S2 made by Angel, DoctorGurke and others.
- Eagle One Development Team Youtube Channel, Various tutorials covering the fundamentals of the Source 2 Hammer editor.
- Brian Vuksanovich's Youtube Channel: Various tutorials covering more niche features of Source 2.
- ReDMooNTV's CS2 Hammer series, Various tutorials for Source 2 hammer by ReDMooNTV
- Easter Lee's underwater overlay and other particles.
- S2ZE - Map Porting Guide
Authors
Thank you for visiting,


With support from the CS2KZ mapping commmunity.